easy Mongolian beef
Chinese food, cooking, Food, recipe, Uncategorized

easy mongolian beef

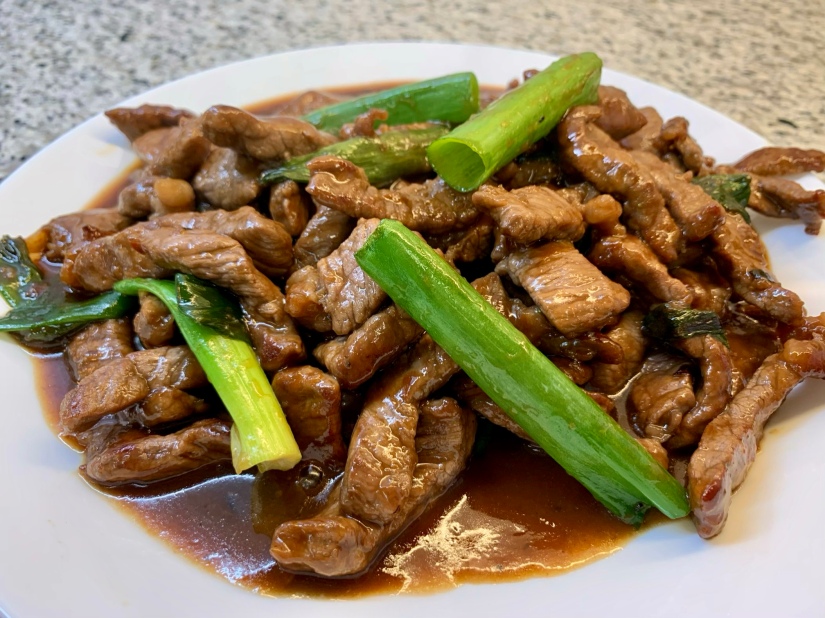
I had never heard of Mongolian Beef before until we had it at PF Chang’s here in Riyadh but it is delicious!  Obviously not an authentic Chinese dish and most definitely not Mongolian, but delicious nonetheless.  Basically it is thinly sliced flank steak and green onions in a sweet soy glaze. Yum!  This is the third time I’ve tried making it and this time not only was it the easiest with the least amount of steps and ingredients but also the best flavour.

At PF Chang’s the beef is most definitely shallow or deep fried to make it really crispy but I decided to keep it a bit on the healthier side by just stir-frying.  (If you’d like to get the beef super crisp though, you can fry in, I would say, about 1 cup of canola oil and then drain the excess oil before adding the sauce.).

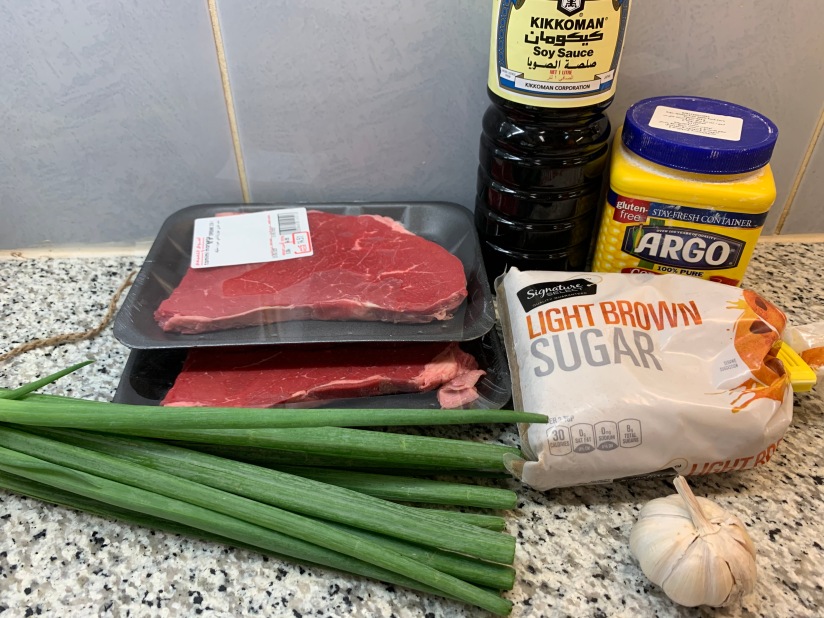
Marinated beef: 500 grams flank steak / 2 tbsp cornstarch / 1 tbsp soy sauce / 1 tbsp cold water

4 cloves of garlic, minced / 1 bunch of green onions – just the green leaves, cut into thirds lengthwise / 2 tbsp canola oil / 1/4 cup soy sauce / 1/4 cup light brown sugar

IMG_1385

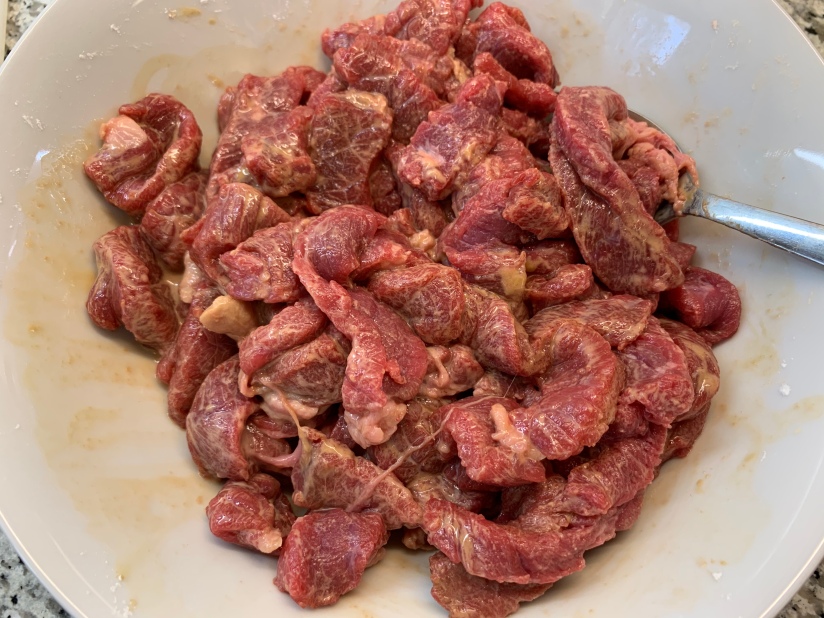
Cut the steak thinly against the grain of the beef.  In a medium bowl, combine the sliced beef, and the cornstarch, cold water and 1 tablespoon of soy sauce so that the beef is throughly coated.  Cover with clingfilm and set in the fridge for 30 minutes to 1 hour to marinate.

In the meantime, simply mix together the 1/4 cup soy sauce and brown sugar in a small bowl for the sauce and set aside.

IMG_1390

In a large wok or frying pan, heat up the oil on medium-high heat.  Add the beef and half of the green onion.  Stir-fry, letting the beef develop some crispier brown bits by not stirring constantly.  When the beef is almost cooked through, add in the minced garlic and stir-fry.

IMG_1393

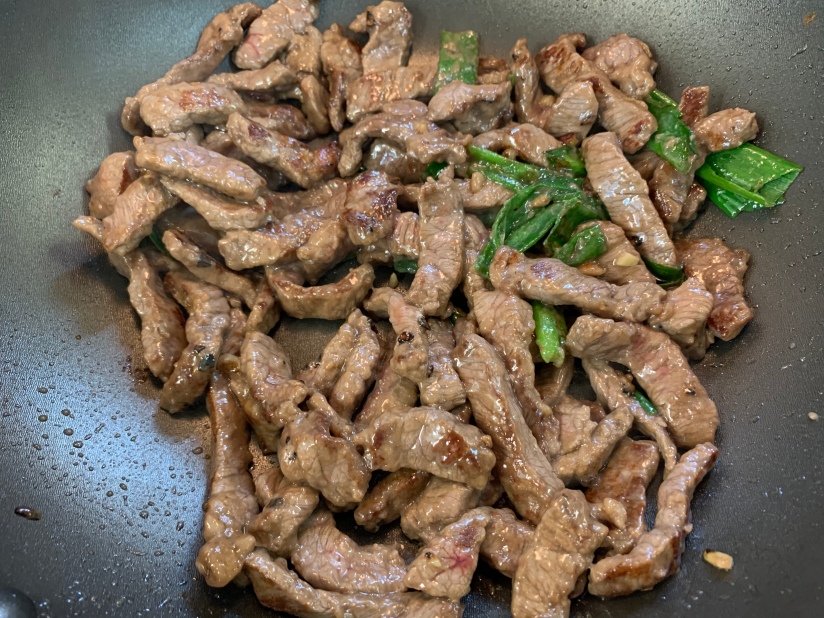
Pour in the soy and brown sugar sauce and stir until it’s thickened up and glossy.  The cornstarch from the beef marinade will cause it to thicken.

IMG_1394

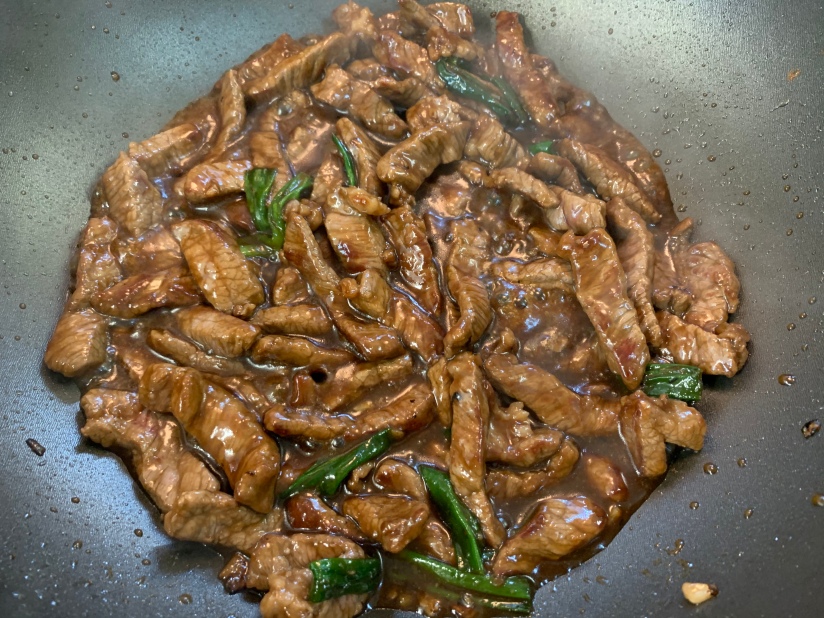
Toss in the remaining green onion, remove from the heat and plate up!  I like to serve this with some jasmine rice and just some simple steamed broccoli.

easy Mongolian beef

yook bang (steamed pork cake)
Chinese food, cooking, Food, recipe, Uncategorized

my grandma’s yook bang (chinese steamed pork cake)

This was my absolute favourite thing to eat when I was a kid and I finally made it myself for the first time! I was such a horrible picky eater growing up but I loved this Cantonese dish that my grandma would make for me.  It’s freshly minced pork mixed with a bit of dried turnip, shaped into a patty and then steamed.  It probably doesn’t sound particularly amazing and it definitely doesn’t look amazing but it is soooo good. I can very vividly remember my grandma using a big cleaver to duk or mince pork on a round wooden cutting block for this dish. She unsurprisingly doesn’t have a ‘real’ recipe for this or any precise measurements for the ingredients but I found that the following worked out well.  Tasted exactly like my childhood!

500 grams pork shoulder / 1/2 tsp salt / 1/2 tsp sugar / 1 tsp light soy sauce / 1 tbsp cornstarch / 1 tbsp diced dried turnip* / grapeseed (or any other) oil just for greasing the dish

*You can find dried turnip (which is weirdly packaged as just ‘dried vegetable’) at an Asian supermarket

IMG_5112

Using a large heavy cleaver, mince the pork. And by mince, I mean hack away at it. You want it about the consistency of ground pork that you would buy from the supermarket.

IMG_5118

IMG_5119

Using chopsticks, mix the pork with the salt, sugar, soy sauce, dried turnip, and cornstarch just until everything is combined. Lightly grease a pie dish or a large rimmed plate with the oil. Get your steamer ready and put the pork mixture into the plate and shape into a round patty.

IMG_5123

You’ll steam this for about 20 to 25 minutes or until the pork is cooked through.

IMG_5124

And there you have it! You will have some liquid in the pie dish which you absolutely should not pour out. Serve this with some veggies and steamed rice and be sure to spoon some of the liquid over the rice.

Chinese steamed fish with black bean and garlic
Chinese food, Food, Uncategorized

chinese steamed fish with black bean and garlic

One of my favourite foods growing up was Chinese steamed fish smothered in fermented black beans and garlic.  I know fermented black beans doesn’t sound like the most appetizing thing but they are sooooo delicious and even if you don’t think you’ll like them, you’ve probably had them in some Chinese dishes.  You can find these beans at any Asian grocery store.  Anyway, I just started cooking with fermented black beans for the first time a few weeks ago so I thought I’d try and make this fish dish.  I haven’t had it in many many years and I don’t even remember if it’s something that my family made or we had when we ate out at restaurants but I remember loving it.  From some lazy googling, it seems like there’s countless variations on how to make it so I decided to adapt my usual Chinese steamed fish recipe and it turned out great!

It would be ideal to use a fresh whole-head-and-tail on firm, white-fleshed fish such as cod but that’s not always possible so then you can go with some nice fillets.  Cod is my favourite but it was sold out at my nearest supermarket today so I picked up some haddock fillets instead and it still turned out good.

1 whole white-fleshed fish or roughly 500 grams of fillets, ideally cod  /  1 bunch of green onions  /  1 medium sized piece of ginger  /  4 tbsp of fermented black beans  /  4 cloves of garlic  /  3 tbsp seasoned seafood soy sauce (or regular soy sauce mixed with about t 1 tsp of sugar)  /  1 and 1/2 tbsp grapeseed oil or other flavourless cooking oil you have on hand

img_0982

Put the black beans in a small bowl and rinse with water a couple of times and drain.  Mince the garlic or if you’re lazy like me, grate it on a microplane.  Toss the black beans, the garlic and 2 tbsp of the soy sauce in a mortar and pestle and just give it a quick little mash or if you don’t have a mortar and pestle, just mash everything together a bit with the back of a wooden spoon.  You don’t wanna pulverize everything as you still want some of the beans intact.

img_0983

Fill a wok with water and place over high heat to bring the water to a boil. Cut the white parts of the green onions off and scatter in a pie plate.  Slice up the ginger and toss a few pieces in with the green onions and then lay the fish or fish fillets over top.  Tuck in a few more pieces of ginger just for kicks. Then using a spoon, spread the black bean and garlic mixture over the tops of the fish.

fullsizerender

Now you’re ready to steam the fish!  Place your steaming rack on the wok and slide the pie plate.  Cover with the lid and steam the fish until cooked through which will take, depending on the fish you use, somewhere between 10 to 15 minutes approximately. Best to test for doneness by using a fork to check that the fish is cooked through and flaking.  Just before the fish is done cooking or right after, thinly snip up the green parts of the green onions, about 2 tbsp or so.  Also, in a small saucepan, heat up the oil over medium to medium high heat until the oil is very hot. When the fish is done cooking, you can either carefully remove the cooking liquid from the pie plate or use a spatula and take the fish out and place on another plate.  Scatter the green onion over the fish and drizzle the hot oil over the green onion.  Finish off with your remaining 1 tbsp of soy sauce and serve with steamed white rice.

img_7899

Chinese food, Food, recipe

shanghainese pan fried pork buns

I love Shanghainese pan fried pork buns and every time I’m back home I have to go out to eat them at least once.  They’re usually eaten for breakfast or lunch and I’ve been really craving them lately so I decided to try and figure out how to make them.  I knew they wouldn’t be super easy to make and I couldn’t find any one recipe that I liked so I threw together this recipe based on about 8 others I found online and hoped for the best.

They taste really great and both Rock and I were impressed with how close they taste to the ones we get in Vancouver!  The filling tastes pretty spot on.  The only thing is we burned the crap outta the bottoms of the first batch and I remembered after that my mom had told me a long time ago that they’re notoriously difficult to make authentically without burning or over-browning,  which would be to cook them sitting in a pan the entire time.  Well, she was right cus boy did they burn.  Anyway, to avoid all that and just make life easier, just take my cheater’s way which is what this recipe will tell you…!

Also we made waaay too much filling, enough for 2 dozen large buns.  So here I’ve adjusted it to make a recipe for 1 dozen buns.

for the bun:  3 cups all-purpose flour  /  2 and 1/4 tsp yeast  /  2 tbsp sugar (plus an extra 1 tsp to proof the yeast)  /  ~1 cup water  /  2 tbsp canola oil

for the filling:  ~350 grams ground pork  /  2 stalks of green onions (just the green part)  /  1 and 1/2 tbsp light soy sauce (light Chinese soy sauce, not the go-to Kikkoman!)  /  1/2 tbsp sugar  /  1 tbsp corn starch  /  1/2 tsp chicken broth powder  /  1/2 tbsp finely grated ginger  /  a few dashes of white pepper  /  1 tsp sesame oil

to pan fry: canola oil

to top/to serve:  white sesame seeds  /  green onion  /  chinkiang vinegar (black rice vinegar.  you can find this at the asian supermarket in Regina)  /  a few matchstick slices of ginger (optional)

photo-7

First make the dough.  Proof the yeast in a small bowl with the 1 tsp of sugar and about 1/4 cup warm water.  In a large mixing bowl, combine the flour, sugar, oil, water and the proofed yeast.  Knead the dough until it’s smooth and add more water or flour as needed.  Set aside and cover with a tea towel for about 15 to 20 minutes.

Next, make up the filling.  This is easy.  Just get a large bowl, throw all the filling ingredients in, and mix together!

Now to make the buns.  Roll the dough out into a log, about 1 foot long.  Cut into 12 equal size pieces.  With each piece of dough, using your hands, roll into a ball and then with a rolling pin, roll it out into a circle, about a centimetre or so thick.  Put about 1 heaped tbsp of filling in the middle and then wrap the dough around the filling by pleating and pinching the sides, making sure the bun is totally sealed.

photo 1-4

Ours definitely did not look as pretty as we had hoped for but I’m sure they’ll get better with practice!  Sprinkle some sesame seeds on the tops and now it’s time to steam them.

photo 2-3

I used a large steamer over my wok.  Brush the steaming rack with a bit of oil to avoid any sticking and space the buns apart on it as they will expand quite a bit!  Steam the buns over medium-high to high heat for about 11 minutes.  Near the end of the steaming, heat up at least a couple centimetres of canola oil in a large frying pan over medium-high heat.  When the buns are done steaming, transfer them to the frying pan and fry the bottoms for a couple minutes or so, until the bottoms of the buns have browned up a bit and are crispy.  Drain any excess oil over some paper towel and then snip some green onion over the tops.  Serve with the chinkiang vinegar with some ginger in it to dip if you want, though I think the vinegar is a vital component!  Enjoy!

photo 3-2

photo 4-2

photo 5