herb & garlic crusted rack of lamb
cooking, Food, recipe, Uncategorized

herb & garlic crusted rack of lamb

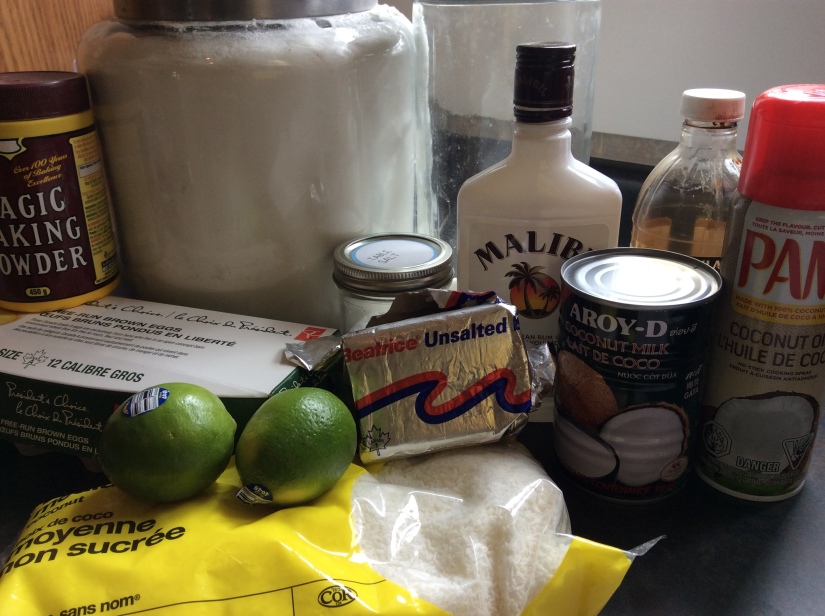
I’ve only had lamb once or twice before and had never cooked it but Rock out of the blue this weekend couldn’t pass up picking up a rack of lamb at Costco.  He’d never cooked lamb before either so I had to figure out what the fuck to do with it.  The one time I can remember eating lamb I’m pretty sure there was mustard involved and a coating of breadcrumbs, but we’re talking over a decade ago so who really knows.  So I had my lamb, wanted to use mustard and breadcrumbs, and wanted to use some of the fresh herbs we’ve been growing in our garden.  I think these are pretty classic flavours to go with lamb.  In the end I threw together bits and pieces from a whole bunch of recipes; whatever recipes came up when I googled ‘rack of lamb.’  Happily, my rack of lamb actually turned out really good.  The lamb did take quite a while longer to cook than what the multiple recipes I read said so definitely use a meat thermometer to check doneness.  Oh and somewhat related, in the past I have been known to stuff mushroom caps using basically this same breadcrumb mixture mixed with some grated parmesan.

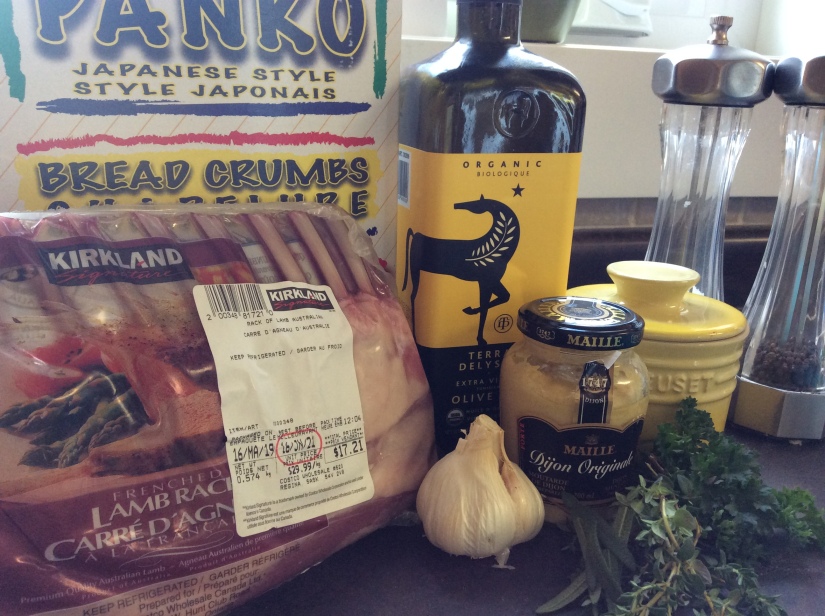
1 frenched rack of lamb  /  1 tbsp olive oil  /  1 tbsp butter  /  salt and pepper to taste  /  2 tbsp Dijon mustard /  2-3 cloves garlic, minced  /  1/2 cup panko breadcrumbs. /. ~ 1 tbsp finely chopped fresh parsley  /  ~ 1/2 tbsp finely chopped fresh thyme leaves  /  ~ 1/2 tbsp finely chopped fresh rosemary

image

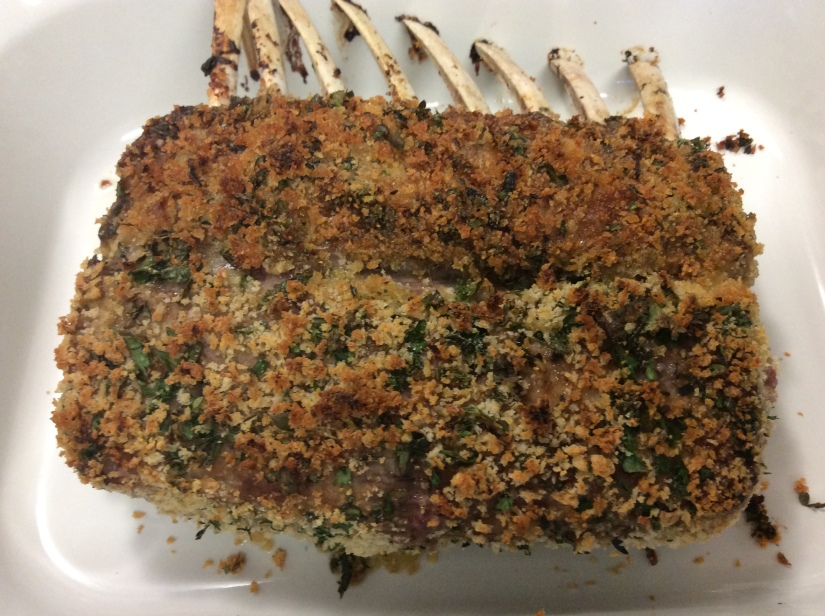
Preheat the oven to 400F.  On a plate, mix together the breadcrumbs, garlic, parsley, thyme and rosemary.  Generously season both sides of your lamb with salt and pepper.  Heat up the olive oil and butter in a large skillet over medium heat and sear all sides of the rack of lamb until nicely browned.  Next, brush the mustard all over the seared meat and then press on the breadcrumb mixture until you have an even coating.

image

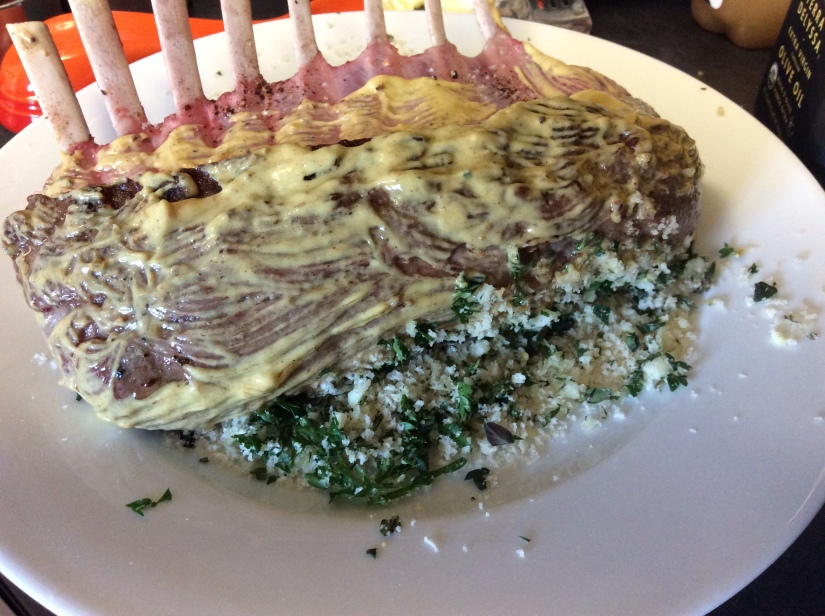
Rock took that ‘action shot’ above.

image

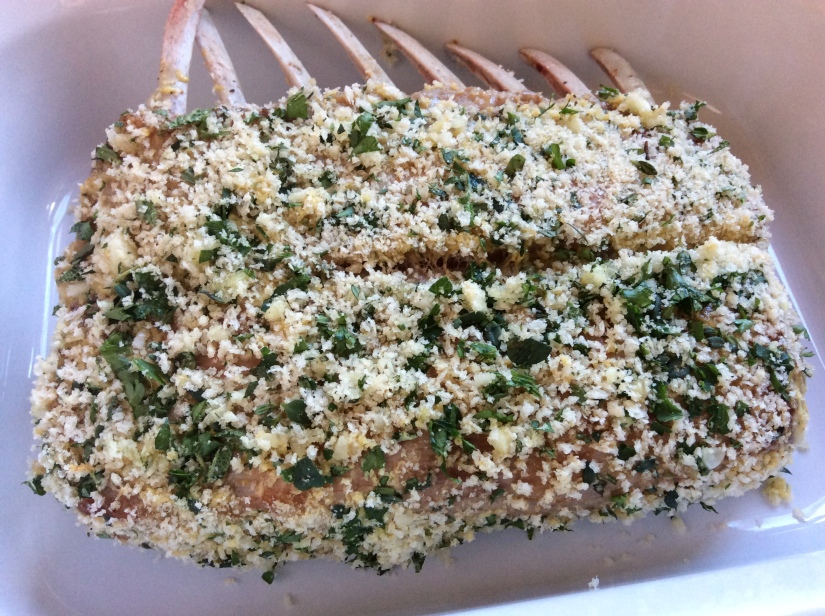
Place in a roasting dish and slap it in the oven for about 20 to 25 minutes.  This is longer than what most other recipes call for but thats how long it took for me.  Just in case, start checking with a meat thermometer around 15 minutes.  For medium rare, you need the lamb to have an internal temperature of 145F.  You definitely don’t want to overcook it ‘cus Rock says overcooked lamb ends up being really tough and that would be pretty damn disappointing.

image

Tent a piece of aluminum foil over the meat and let it rest for 5 to 10 minutes.  Using a sharp knife, cut into single or double chops.

image

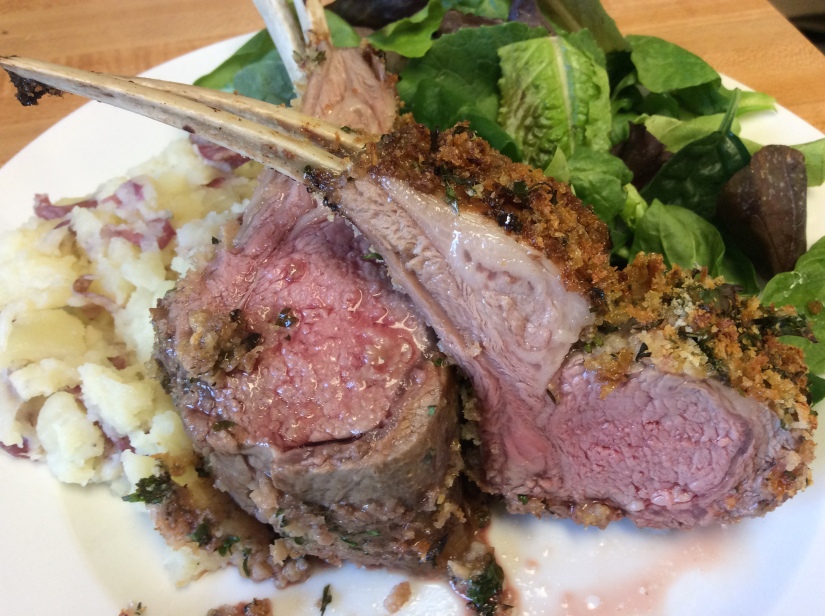
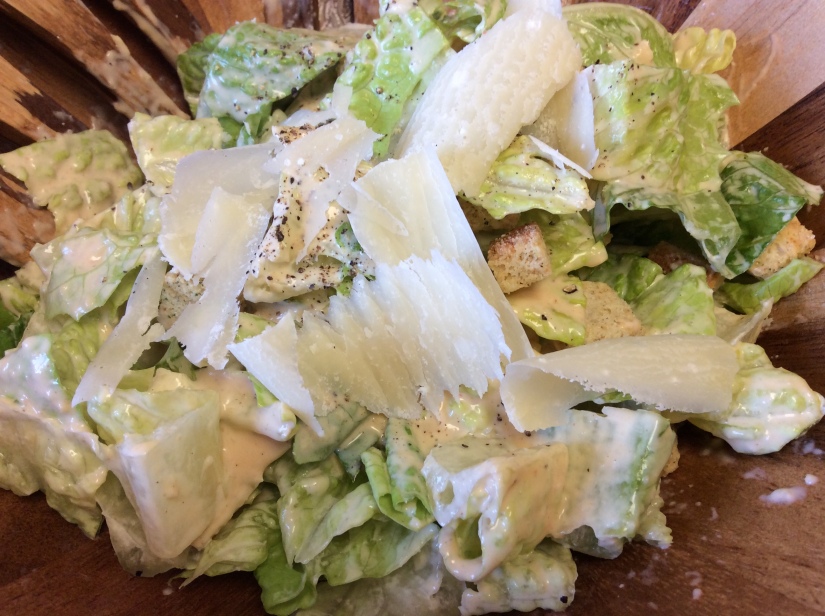
Not bad for my first time cooking lamb!  We had the lamb with just a simple mixed greens salad and some smashed potatoes.

cheesy black bean dip
cooking, Food, recipe, Uncategorized

cheesy black bean dip

I don’t know what’s going on.  I don’t even like beans but I found myself craving this dip that we had at my friend’s house about a month back.  It’s probably ‘cus I love anything with cheese in it and, really, who doesn’t love a good dip?  My friend graciously shared her mom’s recipe for this dip with us.  I may or may not have used a lot (almost double) more than the amount of cheese the recipe calls for.  (I did.)

1 tin of black beans, drained and rinsed  /  1 tsp canola (I used avocado) oil  /  1 small onion, finely chopped  /  2 cloves garlic, minced  /  1 large tomato, chopped  /  1/2 cup salsa  /  1/2 tsp cumin  /  1/2 tsp hot chilli powder  /  1 tbsp lime juice  /  1 cup old cheddar or monterey jack cheese (I used both)  /  1/2 cup chopped fresh cilantro (I just garnished with a few sprigs ‘cus my cilantro plant hasn’t grown enough for 1/2 a cup yet! )

image

Mash the beans with a potato masher or a fork until they’re kinda chunky.  Heat up the oil in a pan over medium heat and sauté the chopped onion and the garlic for a few minutes or until the onions have softened up.  Next, add in the beans, tomato, salsa, cumin and hot chilli powder and cook for about 5 minutes, giving it a stir every so often.

image

Take off the heat, and If you want your dip kinda chunky, now stir in the lime juice, cheese and cilantro.  Since I’m easing myself into eating beans (I don’t like the texture of beans, but I’m suddenly wanting to eat them…what is happening!?), I decided I wanted a pretty smooth dip so before adding in the cheese, etc., I pureed the dip with a hand blender.  Then I added in the lime and cheeses and garnished with cilantro.  Up to you if you want the dip chunky or smooth, it’ll taste great either way!  You can serve this warm or at room temperature with some tortilla chips.

image

dark and sumptuous chocolate cake
baking, cooking, dessert, recipe, Uncategorized

nigella’s dark and sumptuous chocolate cake

This is the second cake I made for Rock’s birthday and the one he specifically requested.  Rock’s had it on his brain ever since we saw Nigella Lawson make it on an episode of her television show, Simply Nigella.  It probably has something do with how she describes it as a ‘cake and frosting of such depth and fudginess’ that it ‘confounds’ and ‘delights’ her.  This cake is actually a vegan cake, though you honestly would never know it, and it really was sooooo good.  It really is dark and fudgy and sumptuous. I don’t think I’ve ever described anything as sumptuous before but this cake totally is that.  I think this may be Rock’s favourite chocolate cake now.  Just a note, the cake is supposed to have pistachios and rose petals scattered over top, which indeed looks amazing, but I skipped this step.

frosting:  1/4 cup cold water  /  5 tbsp coconut butter (or regular unsalted dairy butter which is what I used so my cake wasn’t actually vegan but that’s OK since we’re not vegan!)  /  1/4 cup brown sugar  /  1 and 1/2 tsp instant espresso powder  /  1 and 1/2 tbsp unsweetened cocoa powder  /  6 oz bittersweet chocolate (I couldn’t find any so I subbed with semi-sweet chocolate), chopped up

cake:  1 and 1/2 cups all-purpose flour  /  1 and 1/2 tsp baking soda  /  1/2 tsp fine sea salt  /  1 and 1/2 tsp instant espresso powder  /  3/4 cup unsweetened cocoa powder  /  1 and 1/2 cups brown sugar  /  1 and 1/2 cups boiling hot water  /  6 tbsp coconut oil  /  1 and 1/2 tsp apple cider vinegar  /  1 tbsp edible rose petals (optional)  /  1 tbsp chopped pistachios (optional)

image

Preheat your oven to 350F and line the bottom of a round springform cake pan with parchment paper.  The recipe calls for a 8 inch pan but I only have 9 inch ones and it worked just fine.  First is the frosting so that it has time to cool down before you frost your cake.  Put all of the ingredients for the frosting except for the chocolate into a saucepan over medium-high heat and bring the mixture to a boil.  Turn off the heat and add the chopped up chocolate, letting the chocolate melt down.  Give it a bit of a whisk and then set the frosting aside to cool.  You can give it a little stir every now and again while you work on the cake.

image

Now onto the cake!  In a large mixing bowl, mix together the flour, baking soda, salt, instant espresso and cocoa powder.  In a separate bowl, mix together the sugar, water, vinegar and coconut oil until the coconut oil has completely melted.  Stir the wet mixture into the dry until everything is combined and then pour into your cake pan.

image

Bake for 30 to 35 minutes or when the cake is pulling away from the edges of the pan and an uncooked spaghetti noodle comes out of the centre pretty much dry.  Let the cake cool in its pan on a wire cooling rack and once it’s done cooling, you can frost it.

image

Take the cake out of the pan and pour the frosting over the cake, using a spatula to spread it evenly to the sides.  If you want, sprinkle with the pistachios and rose petals or just leave it be.  Let the frosted cake stand for at least 30 minutes so that the frosting can set before serving.

image

The cake can be stored in an airtight container for up to 5 days.  Ours was unsurprisingly all polished off in 1 day.

coconut lime tea cake
baking, cooking, dessert, recipe, Uncategorized

coconut lime tea cake

I threw a birthday barbecue for Rock this past weekend and made two cakes for the party.  What a lucky guy!  The first one was this tea cake made out of coconut milk, shredded coconut, lime and a hint of Malibu rum.  I guess it’s called a tea cake cus it would pair perfectly with a cup of tea or coffee, which is how Rock’s been polishing off what’s leftover.  The recipe is from Dorie Greenspan’s Baking: From my home to yours, which I had read somewhere is one of the best baking cook books of all time.  I got the book for Rock last Christmas but we hadn’t baked anything from it yet and so I felt it was about time.  This cake turned out really great so I’m stoked to bake some more from this book!

2 cups all-purpose flour  /  1 tsp baking powder  /  a pinch of salt. /  1 cup coconut milk  /  4 tbsp unsalted butter  /  4 large eggs, room temperature  /  2 cups sugar  /  2 limes  /  1 tsp vanilla extract  /  2 tsp coconut rum  /  3/4 cup shredded unsweetened coconut

image

Preheat your oven to 350F and spray with a non-stick spray (we’ve been using Pam coconut oil recently) or butter a Bundt pan.  In a bowl, sift the flour, baking powder and salt together.  Then in a small saucepan, heat the coconut milk, the butter and the juice of one of the limes together until the butter is all melted.  Take off the heat but keep the coconut milk mixture warm.

Next, using a stand mixer with the whisk attachment or sheer manpower, beat the eggs, sugar and the zest of the two limes together at medium-high speed for 3 minutes.  It will look quite thick and about twice the volume.  Add in the vanilla and the rum and then turn the mixer speed down to low.  Slowly add the dry ingredients until everything is just combined.  Scrape down the sides of the bowl with a rubber spatula every now and again, just to make sure everything is mixed well.  Then add in the shredded coconut until it is just blended and then stream in the coconut milk mixture.  When the batter is pretty smooth, it’s ready to be poured into the pan.

image

Bake for 60 to 65 minutes or until a cake tester or uncooked spaghetti noodle comes out of the centre clean.  Let the cake cool in the pan on a cooling rack for at least 10 minutes before popping it out of the pan to continue cooling not the rack.

coconut lime tea cake

I just took another nibble from the tiny bit of cake that’s still left.  So good.  This cake should keep, wrapped in plastic, for 4 days but I find it unlikely you’ll still have any left by then.  I haven’t tried it but apparently when it’s gone a bit stale, it’s very good toasted.  Enjoy!

chicken paprikash
cooking, Food, recipe, Uncategorized

chicken paprikash

Although I’ve been to Hungary twice, for some inexplicable reason I never had chicken paprikash (paprikás csirke) until I made it myself.  I really don’t know why since I love paprika, chicken and sour cream so it’s kind of an obvious sell for me.  Anyway, I was inspired to try make it for the first time this past winter after seeing Lynn Crawford make it on her Food Network show.  I’ve made this a number of times now and we love it though, since I’ve only had my own chicken paprikash, I cannot say how authentic it is or how it tastes compared to chicken paprikash you’d get in Hungary.  Guess we need to go back to Hungary for a visit in the future to find out!

Anyway, I’ve scoured the internet for recipes (for more hours than I’d like to admit) and it seems like there’s a hundred variations on how to make this.  I guess it’s like spaghetti sauce; everyone thinks theirs is the best.  I adapted this recipe from Lynn Crawford’s and while I’m pretty sure wine and red peppers are traditional ingredients, I like how this turns out so I’m sticking with it.

Just a couple of things.  You must use Hungarian paprika, not the generic shit you can get at the regular supermarket.  I’ve tried it before with regular paprika, which in comparison is pretty flavourless, and it’s just not even worth your time.  We had really great hot paprika and sweet paprika that we brought back from Budapest but I used it all up so I had to hunt some down.  There’s none in Moose Jaw but I did find some at the Italian Star Deli in Regina and it shouldn’t be difficult to find in any specialty grocery shops that sell imported items.  I also like to add some tasty Hungarian paprika paste called Piros Arany (translates to Red Gold) that I picked up in Vancouver.  I’ve been told by some Hungarians here that it’s a super popular condiment back home.  If you can’t get a hold of any though, that’s totally fine.

This makes enough to serve 5 to 6 people so feel free to halve the recipe.  But this is actually great as a leftover meal and we think the paprikash sauce is possibly even better the next day.

~ 4 lbs chicken thighs and drumsticks with the skin on and bone in (this was 6 thighs and 8 drumsticks which is what happened to be available at the supermarket)  /  1 tbsp olive oil  /  1 tbsp butter  /  2 red peppers /  2 small onions  /  4 cloves garlic  /  4 tbsp Hungarian sweet paprika  /  3-4 tbsp Hungarian hot paprika  (use more or less depending on how much heat you want and can substitute with more sweet paprika if you’d like)  /  2 tbsp Piros Arany paste (optional)  /  4 heaped tbsp all-purpose flour  /   3 – 4 cups low-sodium chicken stock  /  1/2 cup white wine  /  2 cups full-fat sour cream  /  salt and pepper to taste

image

First for your prep; dice up the red peppers and the onions and mince the garlic.  Now in a large dutch oven or pot (minimum size 5 quarts), heat up the butter and oil over medium-high heat.  In 2 separate batches, sear the chicken on both sides until the skin is starting to turn golden brown.

image

After searing the chicken, take out the chicken and set aside on a plate.  You’ll be left with a sizzling hot combo of butter, olive oil and chicken fat in the dutch oven which is obviously awesome.  Throw in the red peppers, onions, garlic and sauté until the onions are turning translucent.  Next, mix in the hot and sweet paprika and the flour and let that cook for another couple minutes.

image

Splash in the white wine and let it simmer off a bit and then stir in your chicken stock.  You only need as much stock as to mostly submerge the chicken pieces so you can add maybe 3 cups or so first and then see how that works out before adding more.  Season with some salt and pepper to your taste.  Then add the chicken back in and reduce the heat to a simmer.  Pop the lid on and let it simmer away for about 35 to 40 minutes.  The chicken should be cooked through by then but of course you should check.

image

Take the chicken pieces out of the sauce and then for the final step, you add the sour cream.  Apparently, according to my obsessive chicken paprikash research, sour cream can curdle if you just add it straight to your hot sauce so you have to temper it first.  You can do this by gradually stirring in some of the sauce into the sour cream to bring its temperature up and then adding it to the rest of the sauce.  Stir in the sour cream and just let it cook for a couple minutes.  Add the chicken back to the sauce and you’re all done.

image

You can eat this with egg noodles, spaetzle, potatoes, rice… We had it this time with a nice sliced up baguette to sop up all the yummy paprikash sauce.

image

spaghetti with mizithra cheese & browned butter
cooking, Food, pasta, recipe, Uncategorized

spaghetti with mizithra cheese & browned butter

I haven’t been in probably a few years now but I’ve eaten at the Old Spaghetti Factory restaurants in Vancouver and Victoria more times in my life than I could possibly count.  My absolute favourite thing to order there is the spaghetti with mizithra cheese and browned butter.  Mizithra (or myzithra) is a Greek cheese made from sheep’s milk and it is sooooo good.  Anyway, I am obsessed with this dish and I had been recently full on fantasizing about eating it again.  I used to bring back a wedge or two of mizithra from Vancouver whenever I went but I figured there must be somewhere that sells the stuff in Regina.  And then last weekend I discovered the most magical place!  We had driven by  Italian Star Deli a million times and I always said we should check it out but never did.  Then this past weekend we finally did and they had lots of imported stuff from Italy, Greece, Hungary, South Africa, that I had been wanting to get my hands on, including mizithra.  I told Rock it was the happiest day of my life, which is not true, but that’s how excited I was about this deli.

OK, now that I’ve rambled on I’ll get to it.  I’ll be honest, I never was patient enough to actually brown butter and more like just melted it.  But last night I finally took the extra like 3 minutes or so to actually brown butter and it really does make a huge difference.  I’ll never be so impatient with butter again.  This copycat recipe wasn’t so hard to figure out since the dish is literally just spaghetti, mizithra and browned butter but somehow these 3 things together is just the best thing ever.

2 portions of spaghetti  /  ~ 1 cup finely shredded myzithra cheese  /  ~4 rounded tbsp of unsalted butter  /  fresh parsley, finely chopped (optional)

image

Cook your spaghetti in salted boiling water until al dente.  In the meantime, in a small saucepan over medium heat, brown your butter.  After the butter has melted, it will start foaming a bit.  Keep an eye on it ‘cus it will quite suddenly brown and you don’t want it to burn.  You can use a spoon to kinda push the foam to the side to check but you’ll see the milk solids at the bottom of the saucepan start to brown and you’ll smell a sweet, kinda nutty aroma.  That’s what you’re waiting for and as soon as you’ve reached that point, remove from the heat.

image

And then all you have to do is toss your drained cooked spaghetti with the browned butter and then toss in the mizithra cheese and parsley.  The cheese itself is a bit salty so you can taste it first but if you want you can add a bit of sea salt.

image

Butter, cheese and carbs.  Everything I love, together on my plate.

sriracha caesar salad
cooking, Food, recipe, Uncategorized

sriracha caesar dressing

As I’ve mentioned before, I absolutely love Chrissy Teigen’s new cookbook, Cravings, and this recipe for sriracha caesar salad dressing is from her book.  It’s really, really easy to make it and the sriracha gives it a nice little kick.  Ever since I made this on the weekend, I’ve been obsessed with eating caesar salad.

Makes 2 cups and can last in the fridge for 2 weeks.

1 cup mayonnaise  /  4 cloves garlic  /  1 and 1/2 cups finely grated Parmigiano-Reggiano cheese  /  ~ 1 tbsp sriracha  /  juice of 1 lemon  /  1 and 1/2 tsp anchovy paste  /  1 and 1/2 tsp dijon mustard  /  1 tsp worcestershire sauce  /  1/4 tsp salt  /  1/4 tsp freshly ground black pepper

image

And all you have to do is throw everything in a blender or a food processor (or use a hand blender) and process until you get a smooth dressing.  That’s it!

image

Toss the dressing with romaine and croutons and top with more freshly ground black pepper and shaved Parmigiano-Reggiano.  (Yes I know, the salad in the photo’s kinda loaded up with cheese, perhaps excessively, but it’s just so good!)  Tonight I tossed the dressing with a rainbow salad of different shredded veggies which was also delicious and perhaps … a little bit healthier?  I have previously made a caesar dressing using avocado which is really good so it might be fun to try subbing some/all of the mayo in the recipe with avocado next time I make it.

sriracha caesar salad