coconut, beef and potato curry
cooking, Food, Indian food, recipe, Uncategorized

coconut, beef and potato curry

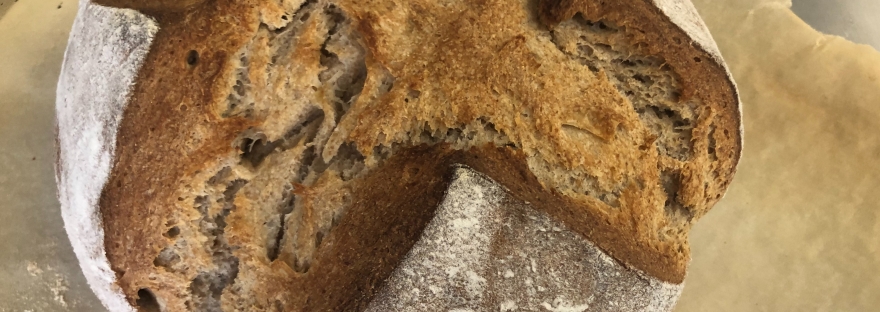
I was flipping through a Christmas edition of an old Jamie Oliver magazine I had kicking around when this recipe caught my eye.  Meltingly tender brisket in a flavourful coconut curry? I’m all in.  I made a few minor adjustments and didn’t use any chillies because my kids like to complain about food being “spicy” lately and I just didn’t want to deal with the drama.  I’m sure this would be extra good with some heat to it but even without, it is really, really delicious and the brisket really is so tender.  It does take basically an afternoon to slow cook, but it is so worth it.

900 grams beef brisket, cut into bite-sized cubes / 2 medium yellow onions, thinly sliced / 5 cloves garlic, minced, 1 thumb-sized piece of fresh ginger, minced / 3 tbsp canola oil / 2 cinnamon sticks / 2 star anise / 1 tsp black peppercorns / 5 whole cloves / 1 tsp ground cardamom / 1 tbsp garam masala / 1 tbsp medium curry powder / 1 tbsp ground coriander / 1 400 ml can of full-fat coconut milk / 1 x 400 grams tin of whole tomatoes / 600 grams potatoes / sea salt to taste / (optional: 4 green chillies, sliced)

IMG_2900

Preheat the oven to 300 F.  Heat up your oil in a dutch oven over medium heat and then add in the sliced onions, cooking them for about 10 minutes or until they’re all soft and translucent.  Then add in the ginger, garlic, cloves, star anise, cinnamon sticks, cardamom and peppercorns (and chillies if you’re using them).  Mix in 200 ml of water and bring it to a boil.

IMG_2902

Turn the heat up to high and season the cubes of brisket with a bit of salt.  Add in the beef and mix to coat the beef with the onion-y spice mixture.

IMG_2904

Next, add in the coconut milk, the whole tomatoes (including the juice), garam masala, ground coriander and curry powder.  Add in a bit of salt to taste and then switch off the burner and pop the lid onto your dutch oven.

IMG_2907

Place the dutch oven into your preheated oven for 2.5 hours.  When that time is up, peel and cut up your potatoes into bite-sized cubes and add to the curry.  Give it a bit of a stir to get the potatoes all submerged and then put the lid back on and put back into the oven for a further 1.5 hours.

IMG_2908

Your whole house should smell amazing at this point!  And after being patient for the past 4 hours, your curry is ready.   The recipe in the magazine has this as a one-pot wonder but for me, rice is life so I had to serve it with some basmati rice.  Turned out amazing and Rock has already requested that I make it again soon!

coconut, beef and potato currycoconut, beef and potato curry

sourdough rye bread
baking, breakfast, cooking, Food, recipe, Uncategorized

sourdough rye bread

Rock has decided to blog for the first time in possibly a couple of years! He always wants me to edit his English but… I’m not going to. Here he is!

Bread is one of the principal forms of food for man from the dawn of time.  Archeologist found proof of stone-crushing barley and wheat use to make floor thought to be 7500 years old.  In the British Museums’ Egyptian galleries, you can see loaves which were made and baked over 5000 years old.  

My rye bread is actually quite easy to bake.  The difficult part is to get the sourdough starter strong enough to make a delicious loaf.  This part can take weeks or you can ask a friend to share some of them with you.  Linzi was kind enough to share hers with us.   The starter is actually natural yeast. The recipe is simple; 100 gr of floor, 100 ml of water and a tablespoon of yesterday mix all together.  You repeat this until the mixture double his size in 6 hours. Every day you need to feed it.   If you don’t bake, the major part of the mixture will be discarded.   This ratio is sufficient to bake a bread and have enough left for a feeding.

When the sourdough starter doubles his size in 6 hours and the smell is very sour, you can put together the ingredients to bake your bread.

2 cups of all-purpose flour / 1 cup of rye flour / ¾ cup sourdough starter / 1 ¼ cups of warm water / 1 tablespoon of honey (optional) / 1 and ½ teaspoon of salt

IMG_7172

I mix the dry ingredients, flour and salt, first in the mixer bowl.  Then, I mix the water, the sourdough starter and the honey in a different bowl. The honey is optional but it will give you a nice brown color and a boost for the yeast.  Add the wet ingredient into the dry ingredients and mix until combined; cover with a dishtowel and let sit for 15 minutes.

IMG_7174

Using the dough hook, knead the dough for 5 minutes at medium speed.  Most likely you will need to add flour.  The goal here is to have a dough that is still clinging to the bottom of the bowl but clearing the upper part of the bowl.  The dough will be wet and sticky so don’t use too much flour.

IMG_7178

Transfer the dough into a medium size bowl coated with a little of oil; I use olive oil.  Cover with a plastic sheet and let rise for 3 hours.  I turn and fold the dough once or twice during the first rise.  The texture of the dough will change rapidly from a stick ball to a firm, none sticky, very elastic dough.  The smell will get stronger too.

After 3 hours, I turn and fold it again.  I form a nice ball and transfer it on a parchment paper.  I use an upside-down bowl to cover the dough for the second rise, about 2.5 hours.

IMG_7179

20 minutes before the end of the second rise, I put a pizza stone in the oven and turn it to 450 F.  This will permit the stone to warm up nicely.  

When ready, I dust up the dough with some flour and make some cut in the middle, about 1 cm deep.  Set the dough in the middle of the pizza stone and bake for 30 min.

IMG_7199

Then remove the bread from the pizza stone and transfer it on a cooling rack.

Et voila!

IMG_7200

I really like this bread.  We tried different kind of flour.  If you use 3 cup of all-purpose flour you will get a better rise and the final product is less dense.  The next experiment will be with spelt flour. 

grilled three-cheese sandwich
cooking, Food, recipe, recipes, Uncategorized

grilled three-cheese sandwich

Disney has been posting a bunch of recipes from the Disney Parks which we’ve really enjoyed as we’re big Disney fans!  A while ago we made a couple of our Disneyland faves – their churros and dole whip with the kids which was a total hit.  So I decided to try their grilled three-cheese sandwich from Woody’s Lunch Box in Disney’s Hollywood Studios which we haven’t actually had there but it was, no surprise, amazing!  I tweaked the recipe a bit and Rock baked a fresh loaf of sourdough and we were on our way.

This does make 4 LARGE sandwiches.  If you were to use say sandwich bread, you could easily cut all the ingredients (minus the number of bread slices) in half.  Or just have it be super cheesy, which wouldn’t be bad either!

Makes 4 sandwiches.

cream cheese spread: 1/2 cup spreadable cream cheese (the kind in a tub, not a brick) / 1/2 cup finely shredded sharp cheddar or double Gloucester / 1/4 tsp sea salt

garlic spread: 1/2 cup mayonnaise / 1/ and 1/2 tsp minced garlic / 1/2 tsp sea salt

8 slices of artisan bread (we used homemade sourdough) / 8 slices of cheddar / 8 slices of provolone

IMG_1356

First make the two spreads.  For the cream cheese spread, simply mix all the ingredients for it together in a small bowl.  And for the garlic spread, you guessed it, mix all the ingredients together in a bowl.

IMG_1357

On 4 slices of bread, place 2 slices of cheddar on each and then place 2 slices of provolone on each of the remaining 4 slices of bread.  Spread a quarter of the cream cheese spread on each of the slices with provolone.

IMG_1359

Sandwich the cheddar and provolone sides together and then spread the garlic spread on  the top side of the sandwiches.

IMG_1360

Heat up a large frying pan over medium heat and then place the sandwiches, garlic spread side down and grill for about 2 minutes or until the cheese is starting to melt and the bread is golden brown.  Spread the garlic spread on the now top side of the sandwich and flip the sandwich over to cook for another 2 minutes or so on the other side.

IMG_1362

Once all the cheese is melted and gooey and the bread is all nicely golden browned all over, they’re done! Slice in half and eat!

grilled three-cheese sandwich

no-bake dark chocolate tart
baking, cooking, dessert, Food, recipe, Uncategorized

no-bake dark chocolate tart

I have spent many an evening this week thinking about this tart.  This is my adaptation of a recipe from our friend who has made her tart a couple of times for us and it is just so delicious.  It is also very easy to make as it is a no-bake recipe.

Her original recipe calls for double cream or whipping cream but I have swapped it out in favour of coconut cream.  I always have coconut milk in my pantry and if you don’t have coconut cream on hand, just leave a can of coconut milk to sit overnight and do not shake it before opening.  The coconut cream will rise to the top of the can and you can just use that.

crust: 180 grams digestive biscuits or graham crackers / 110 grams unsalted butter / 1/4 tsp ground cinnamon

chocolate filling: 210 grams dark chocolate / 100 ml coconut cream / 40 grams unsalted butter / 1/2 tsp vanilla extract / 25 grams shelled pistachios

IMG_1252

In a blender or food processor, blitz the digestive biscuits into crumbs.  Melt the butter for the crust in the microwave and add that along with the cinnamon to the blender.  Just pulse to combine everything together

IMG_1253

Using the back of a spoon, press the crumb mixture onto the base and slightly up the sides of a tart pan or an 8″ springform cake pan.  You could also use pie plate if you don’t have either of those.  Pop into the fridge for about 30 minutes to chill and set.

IMG_1254

In the meantime, you can lightly chop up the pistachios and set aside.  Bring a small saucepan of water to a simmer and set a heatproof bowl over top, making sure the bottom doesn’t touch the water.  Add the chocolate, coconut cream and butter to the bowl.

IMG_1255

Keep stirring until everything has melted together.

IMG_1258

Pour the chocolate filling into the crust and then sprinkle the chopped pistachios over top.

IMG_1259

Cover with cling film and chill in the fridge for about 3 hours to fully set the chocolate filling.  And voila!  Keep any leftovers (if you have any) chilled in the fridge.

no-bake dark chocolate tart

chicken sausage rolls
appetizers, brunch, cooking, Food, recipe, Uncategorized

chicken sausage rolls

Back when I was in Darwin, Australia, I briefly worked at the best little pie shop ever and ate their sausage rolls probably everyday.  I have LOVED sausage rolls ever since! But in Saudi of course we can’t get any pork sausage.  Then awhile back, a friend dropped off some chicken sausage rolls that she made and I realized, I should’ve been making chicken sausage rolls this whole time!

I wasn’t that happy with my first attempt but I’ve been working on a recipe for awhile and THIS I am very happy with.  The chicken sausage is very flavourful and not dry at all.  I minced up chicken thighs with our Kitchenaid meat grinder but of course you can just use store-bought ground chicken.

Makes 15 sausage rolls or 45 bite-sized sausage rolls.

Sausage filling:  450 grams ground chicken (mince) / 1/4 cup bread crumbs / 1 tsp dried rosemary / 1 tsp dried basil / 1 tsp dried oregano / 1 and 1/2 tsp sweet paprika / 1 tsp onion powder / 1 and 1/2 tsp garlic powder / 1 tsp sea salt / 1/4 tsp ground black pepper / 1 tsp Worcestershire sauce / 1 and 1/2 tbsp cold water /

15 squares of frozen puff pastry, defrosted but still cold / 1 egg

IMG_1173

Preheat the oven to 400 F.  And then easy enough, combine all the ingredients for the sausage filling in a large bowl.  You can stir together or just mix with your hands until everything is mixed well together.

IMG_1176

Now start assembling the sausage rolls.  Place about 2 tablespoons of sausage filling just off-centre along each square of puff pastry.  Make sure to spread the sausage evenly from top of the square to the bottom.  In a small bowl, lightly beat the egg to make an egg wash.

IMG_1177

Tightly roll the pasty over starting with the side that’s closer to the filling.  Just before sealing, brush the bottom side of the pastry with the egg wash.  Keep rolling and then with the seam-side down, gently push down to seal the pastry.

IMG_1179

IMG_1180

If you want you can leave the sausage rolls whole but my kids prefer them when they’re more bite-sized.  So if you’d like to make bite-sized rolls, use a sharp knife and cut each roll into thirds.  Then, brush the top of each roll with egg wash.

IMG_1181

Bake for 25 to 30 minutes or until your pastry is nicely golden brown.

chicken sausage rolls

And enjoy!  Eat on their own or as we like to do, dip into some ketchup.

chicken sausage rolls

homemade paneer
cooking, Food, Indian food, recipe, Uncategorized

homemade paneer

There’s a recipe for the Indian fresh cheese paneer in the cookbook Made In India by Meera Sodha that I’ve always eyed over the years but never tried making.  Nowadays though I can’t find any store-bought paneer so I decided to give homemade paneer a shot.  Turns out it’s actually really easy! Plus there’s only 2 ingredients.  The recipe from my book doesn’t give very detailed instructions and my first attempt wasn’t perfect (my milk boiled over everywhere and didn’t properly curdle) but after watching some Youtube videos, I’ve got it down now.

Makes about 200 grams of paneer.

8 cups whole milk / 1/4 cup fresh lemon juice

IMG_0929

In a large saucepan or pot, heat the milk over medium heat until it comes to a boil.  On my first go at the recipe I had the heat set on high which was a big mistake so keep it on medium.  Stir frequently to keep the milk from burning on the bottom – this will take some time so try and be patient.  I didn’t set a timer but I think it took about 20 minutes at least for fridge-cold milk to boil.  As soon as it’s come to a boil, turn the heat down to low.

IMG_0938

Add the lemon juice and stir.  It should start curdling pretty much right away – which is the curds separating from the whey and forming lumps.  I kept it on low and kept stirring for a few minutes just to really get the curds forming.

IMG_0944

Line either a large colander or a strainer set over a large bowl with a few layers of cheesecloth and ladle the curds in.  The whey will drain through and you’ll be left with just the curds.

IMG_0954

Rinse the curds under some cold water (I just ran it under the tap) to wash off the lemon juice.

IMG_0957

Using the corners of the cheesecloth, twist together until it’s tight and squeeze the liquid out of the curds.

IMG_0958

Meera says to leave the paneer in the colander with a weight on top but I found that whatever I put on it kept falling over.  So I ended up putting the paneer – still tightly twisted up in the cheesecloth – on a plate, then putting a frying pan on top of the paneer, and then a bag of rice in the pan and that did the trick.  You just want to weigh the paneer down and press it into a solid cheese.  Leave for 2 to 3 hours or until it feels firm.

homemade paneer

Then put it in the fridge either wrapped in plastic wrap or in a container until you use it. You can keep it in the fridge for about 3 days.  The paneer turned out great and it really is unbelievably easy to make!  Plus it doesn’t have all the extra ingredients and additives that are in store-bought paneer.  Definitely worth giving a shot – if you need inspiration, we made palak paneer with this today!

IMG_0963

masala chai pound cake
baking, breakfast, cooking, dessert, Food, recipe, Uncategorized

masala chai pound cake

After making my espresso coffee cake, I started thinking about making a cake using tea.  I decided to try making a chai cake and I found a recipe for a chai-spiced pound cake on the King Arthur Flour website that looked good but I wanted it to actually have tea in it as well and not just the spices.  So I spent a silly amount of time reading up on adding tea into baked goods – the easiest way would be to steep tea in milk or another liquid used in your recipe but this pound cake recipe didn’t have any liquid in it.  So I decided to infuse the butter with tea!

A couple of things – you do need to melt the butter, infuse it, and then let it cool back to room temperature which takes some time so just keep that in mind.  And also, you’ll need to start off with more butter than is needed in the recipe because after you add the tea, the tea will absorb some of the butter and you’ll lose some as you strain it.  The end result is fab though – the cake actually tastes like a warming cup of masala chai.

300 grams of unsalted butter (the cake will actually only require 16 tbsp or 227 grams of infused butter) / 4 black tea bags / 1 cup light brown sugar / 1/4 cup honey / 2 large eggs, room temperature / 1 tsp baking powder / 1/4 tsp baking soda / 1 tsp sea salt / 1 tbsp ground cinnamon / 2 tsp ground ginger / 2 tsp ground cardamom / 1 and 1/2 tsp ground allspice or ground cloves / 1 tsp black pepper powder / 2 cups all-purpose flour 1 cup full fat Greek yogurt, room temperature / 2 tsp vanilla extract

IMG_0488 2

In a small saucepan over medium heat, add the butter and melt.  Tear open the tea bags and add the tea leaves to the melted butter.  Open at least one of the tea bags carefully so that you can use it to line a small strainer. Turn the heat down to low and let the tea steep in the butter for 5 minutes.

IMG_0496

Take the saucepan off the heat and let it steep for a further 5 minutes.  Using one of the opened tea bags, line a small strainer and then pour the butter through to strain out the tea. If a bit of the tea does end up in the butter, no big deal.

IMG_0494 2

OK and now for what I found to be the toughest part – waiting for the butter to cool and solidify as the recipe requires room temperature, not melted, butter!  I’m pretty impatient so I stuck the bowl in the fridge for about 40 minutes, giving it a stir a couple times.

IMG_0497 2

Hard part is done.  Preheat the oven to 350F.  Add 227 grams or 16 tbsp of the tea-infused butter, the brown sugar and the honey to the bowl of a stand mixer.  Using a paddle attachment, beat at medium speed for two minutes.

IMG_0498 2

Add the eggs one at a time.  Beat on medium speed for two minutes in between each addition.  Then stir in the baking powder, baking soda, salt, cinnamon, ginger, cardamom, allspice or cloves and black pepper.

IMG_0499 2

Stir in half of the flour just until incorporated and then add in the yogurt and vanilla.  Again, stir just until incorporated.  Scrape down the sides of the bowl as needed. Add in the last half of the flour and stir just until incorporated.

IMG_0501 2

Lightly grease with butter and lightly flour a 9 or 10-cup bundt pan.  Spread the cake pan evenly into the pan.

IMG_0502 2

Bake for about 50 minutes or until a toothpick / dry spaghetti noodle comes out of the centre clean.  Let the cake cool in the pan for about 15 minutes before removing from the pan.

IMG_0503 2

Let the cake cool completely on a cooling rack before slicing.  Enjoy!

masala chai pound cakeIMG_0512 2


John's LEGENDary fried chicken
cooking, Food, recipe, Uncategorized

john’s legendary fried chicken

I love me some fried chicken so I’m kind of surprised I’ve never actually made fried chicken myself.  I always figured it would be a lot of effort with buttermilk, eggs, double breading or whatever… but then I watched John Legend making his “LEGENDary” fried chicken on Youtube and his recipe looked too easy!

A few things – I only used chicken thighs because well, fried chicken thighs are my favourite.  But of course you could use whatever chicken pieces you’d like.  Also, I only use a fraction of the cayenne powder in the recipe because I don’t want my kids complaining that it’s spicy.  And it’s recommended to brine this chicken overnight so that’s something to keep in mind.  I haven’t done that yet because I always forget but a minimum of 4 hours has worked for me.

Anyway, I’ve made this twice in two weeks already because Aymeric asks me every single day to make it!  He calls it “oil chicken” and basically has hearts in his eyes when he says it – that’s how good it is.

5 lbs (2.2 kg) chicken pieces (of course you don’t have to make this much chicken! I’ve used 1.5 kg of thighs and I think that’s perfect for 4 people.  Just adjust the recipe to use less of the spices and flour) / canola oil for deep frying

the brine: 6 tbsp seasoned salt salt / 2 and 1/2 tbsp garlic powder / 2 tbsp cayenne powder / cold water

the breading: 2 cups all-purpose flour / 2 tbsp seasoned salt / 1 tbsp cayenne powder

IMG_9993

First, brine the chicken.  Add the chicken pieces and the seasoned salt, garlic powder and cayenne for the brine into a large bowl.  Add enough cold water to cover the chicken and then slap some cling film over top and put it in the fridge for a minimum of 4 hours but ideally overnight.

IMG_9995

When you’re ready to fry up some chicken, heat up the canola oil to about 350 to 365 F in a dutch oven or a deep fryer.  I have a deep fryer back in Canada which makes deep frying sooo easy but here we just use a dutch oven – in this case, just add enough oil for the chicken to be submerged.  If you have a candy thermometer you can check the temperature but if you don’t have one, I find putting the dutch oven over medium-heat to give a close temperature.

Now, time to bread the chicken.  Add the flour, seasoned salt and cayenne for the breading into a large ziplock bag.  Then add the chicken pieces, in small batches (I did 4 or 5 pieces at a time) into the bag, zip it up and shake shake shake until the chicken is all coated.

IMG_0001

Fry the chicken until golden-brown to brown and the chicken is cooked through.  You can check with a meat thermometer if you want to be sure (that would be 165F).  For thighs, I found 18 minutes to be perfect.

IMG_0002

After frying, drain any excess oil off the chicken on a paper towel-lined plate.

IMG_0004

And just keep going until you’ve fried up all your chicken and then enjoy!  Chicken is super juicy, flavourful and crispy. Perfect!

John's LEGENDary fried chicken


beef with simple béarnaise sauce
cooking, Food, recipe, Uncategorized

beef with simple béarnaise sauce

Lately I’ve taken to watching clips from the old school Nigella Lawson cooking shows on Youtube right before bed.  Her early series were just the best and turns out she’s very soothing to watch before going to sleep.  One of the clips I watched was for her mom’s beef with a simple béarnaise sauce that she said is what she would eat for her last meal on earth.  Well, I’m sold.

I couldn’t find the recipe online and she doesn’t mention measurements in the video but I did find a different version of her recipe and I just kind of meshed that with the clip and then adapted it to what ingredients I have.  This is not a truly authentic béarnaise sauce but, especially while in quarantine, I’m perfectly fine with having a simplified recipe that requires less steps and less ingredients.  Plus the sauce turned out sooo good.  I just want to pour it over everything!  Ideally, you have some fresh tarragon to chop up and add to the sauce at the end, but I didn’t and I still feel like it was excellent.

Bearnaise sauce: 3 large egg yolks / 2 tbsp white wine or apple cider vinegar / 1 and 1/2 tsp dried tarragon / 16 tbsp (226 grams) unsalted butter, cut into roughly 1/2 inch cubes / juice of 1/2 a lemon / sea salt to taste

Beef: ~ 500 grams top rump steak, about 1 inch thick (to be honest I don’t even know what cuts of beef I used because the shop here doesn’t always label the beef accurately.  Just get what you like!) / olive oil / sea salt

IMG_0390

Using a double boiler or a medium metal bowl set over a pot of simmering water (don’t let the water touch the bottom of the bowl!), add the egg yolks, tarragon and vinegar.

IMG_0392

Start whisking and as you whisk continuously, add 1 cube of butter at a time – don’t stop whisking! – until you have added all of the butter.

IMG_0396

IMG_0398

Remove from the heat and add the lemon juice and salt to taste.

IMG_0399

Heat up a large frying pan over medium-high heat.  Brush the beef with olive oil on both sides and place in the pan.  Cook for 2 minutes on one side and then flip and let it cook another 2 minutes on that side.  The steak will be about medium-rare – if you want it more well done then cook for a bit longer on each side.

IMG_0400

Let the beef rest on a cutting board for a few minutes and in the meanwhile, season with some salt.  Slice the beef and plate and then spoon the béarnaise sauce over top.

beef with simple béarnaise sauce

matcha and white chocolate chunk cookies
baking, cooking, Food, recipe, recipes, Uncategorized

matcha and white chocolate chunk cookies

I cannot get over how good these are! If you’re a matcha fan then you will love these soft and chewy matcha cookies filled with chunks of white chocolate.  My sister made some matcha cookies the other day which got me thinking, Why have I never made matcha cookies?!  She sent me the recipe she used but she said the cookies didn’t have much of a matcha taste and were a bit crispy on the outside.  So I did some cookie research and found a recipe on a blog called Salu Salo Recipes.  It looked pretty legit but I did make some changes – namely more matcha (‘cus I want these to actually taste like matcha!) and with less sugar and chocolate.

Makes 18 cookies.

2 cups all-purpose flour / 1 and 1/2 tbsp matcha / 1/2 tsp baking soda / 1/2 tsp sea salt / 1/2 cup brown sugar / 1/2 cup granulated sugar / 3/4 cup (170 grams) unsalted butter, melted / 1 large egg / 1 large egg yolk / 1 tsp vanilla extract / 150 grams white chocolate

IMG_0184

Preheat the oven to 325F.  In a medium bowl, mix together the flour, baking soda, salt and matcha powder.

IMG_0164

Next, in your stand mixer, beat together the melted butter, granulated sugar and brown sugar with the paddle attachment until combined.  Then add in the vanilla, egg and egg yolk.  Beat on medium speed until the mixture is quite light and creamy.

IMG_0166

Now add in the dry ingredients mix to the stand mixer bowl and mix on low to medium speed just until everything is combined.

IMG_0172

Then, with a sharp knife, chop up your white chocolate into chunks.

IMG_0173

Add the white chocolate chunks into the cookie dough and using a wooden spoon, fold the chocolate into the dough.

IMG_0176

Using a tablespoon, measure out about 1 heaped tablespoon of dough per cookie.  Roll into a ball and place on a parchment lined baking sheet.  Space out the dough balls as the cookies will spread as they bake.

IMG_0178

Bake for about 10 minutes or until the cookies have lost that raw dough sheen.  The recipe I adapted this from said to bake until the edges go lightly brown but I think that would be hard to tell since the cookies already have colour to them and I wouldn’t want to risk over baking these seeing as I want soft and chewy cookies!

IMG_0179

After removing from the oven, let the cookies cool on the baking sheet for a few minutes as they will still be very soft.  Then transfer them to a cooling rack to finish cooling.  They’ll be quite fat and puffy still when you first pull them out of the oven but they will flatten a bit as they cool.

matcha and white chocolate chunk cookies

Enjoy!  Honestly, I think these are amazing.  Enough matcha flavour but balanced out with the sweetness from the white chocolate.  And so soft and almost fudgy! Love it.

matcha and white chocolate chunk cookies