cooking, Food, recipe, recipes, Uncategorized

swedish meatballs & cream sauce

More often than not, a trip to IKEA for us includes a stop for some Swedish meatballs. It’s been awhile and there’s no IKEA here on Vancouver Island so I decided I need to start making some myself. These are so good AND I make a dairy-free cream sauce (thanks for nothing lactose intolerance) which tastes totally spot on.

for the meatballs:

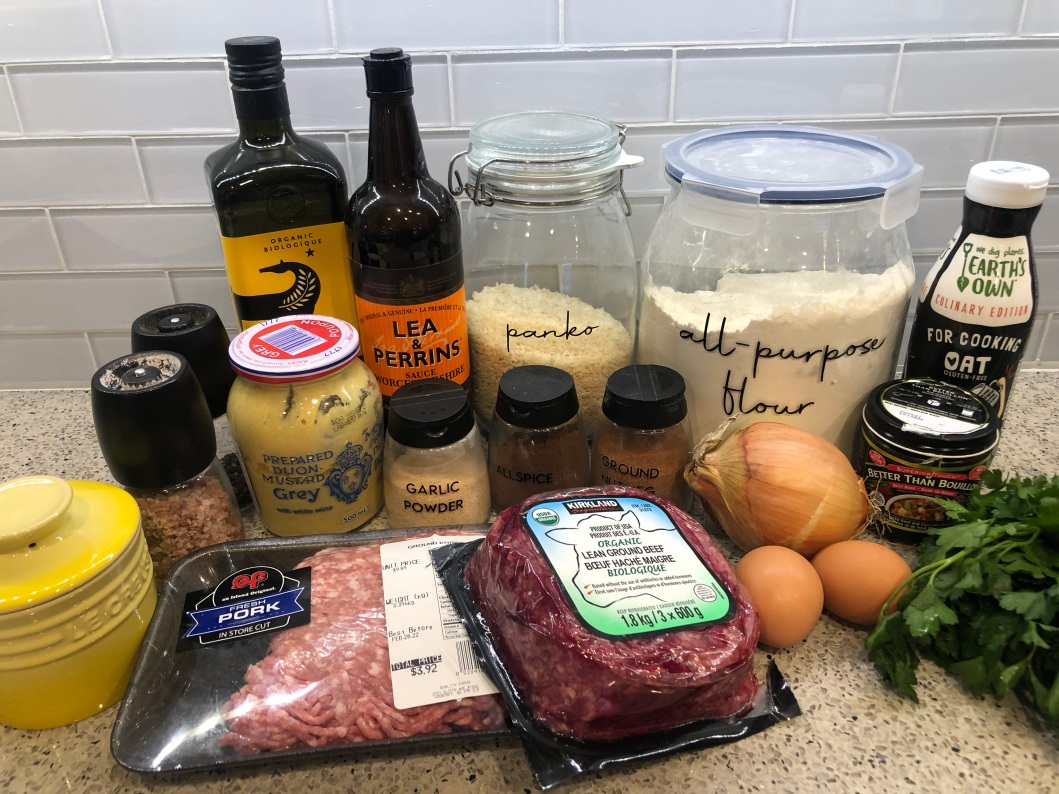
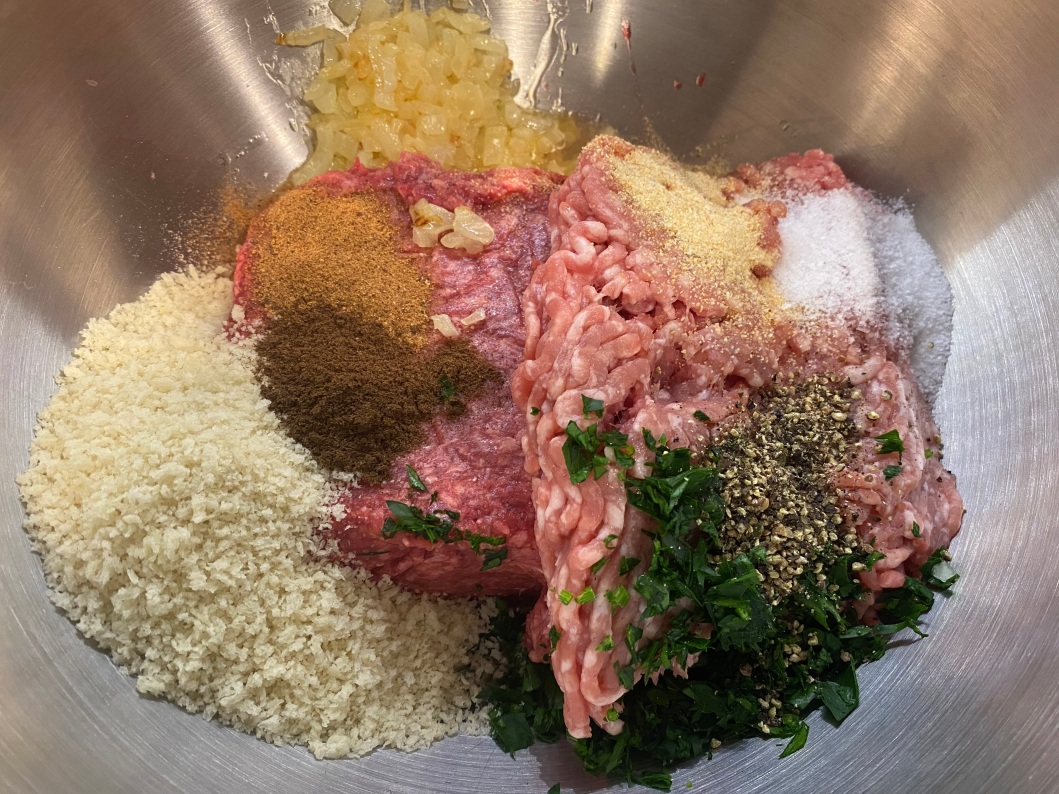
~45O grams ground beef / ~450 grams ground pork / 1/2 cup panko crumbs / 2 tbsp chopped fresh parsley / 1/2 tsp ground allspice / 1/2 tsp ground nutmeg / 1/2 yellow onion, finely chopped / 1/2 tsp garlic powder / 1 tsp sea salt / 1/2 tsp ground black pepper / 2 large eggs / 2 tbsp unsalted butter / 1 tbsp olive oil

for the cream sauce:

6 tbsp unsalted butter / 7 tbsp all-purpose flour / 3 cups beef stock / 1 tbsp Worcestershire sauce / 2 tsp dijon mustard / 3/4 cup heavy cream OR plant-based cream (I like Earth’s Own ‘for cooking’ oat cream) / salt and pepper to taste

optional: chopped fresh parsley for garnish

First, in a large non-stick skillet over medium heat, heat up 1 tbsp of the butter and then add in your chopped onions. Cook while stirring until soft and translucent. Then in a large mixing bowl, add in the cooked onions, beef, pork, panko, chopped parsley, allspice, nutmeg, garlic powder, salt and eggs. Using your hands, mix everything together until just combined – over-mixing will make the meatballs tough so mix just until it’s all come together.

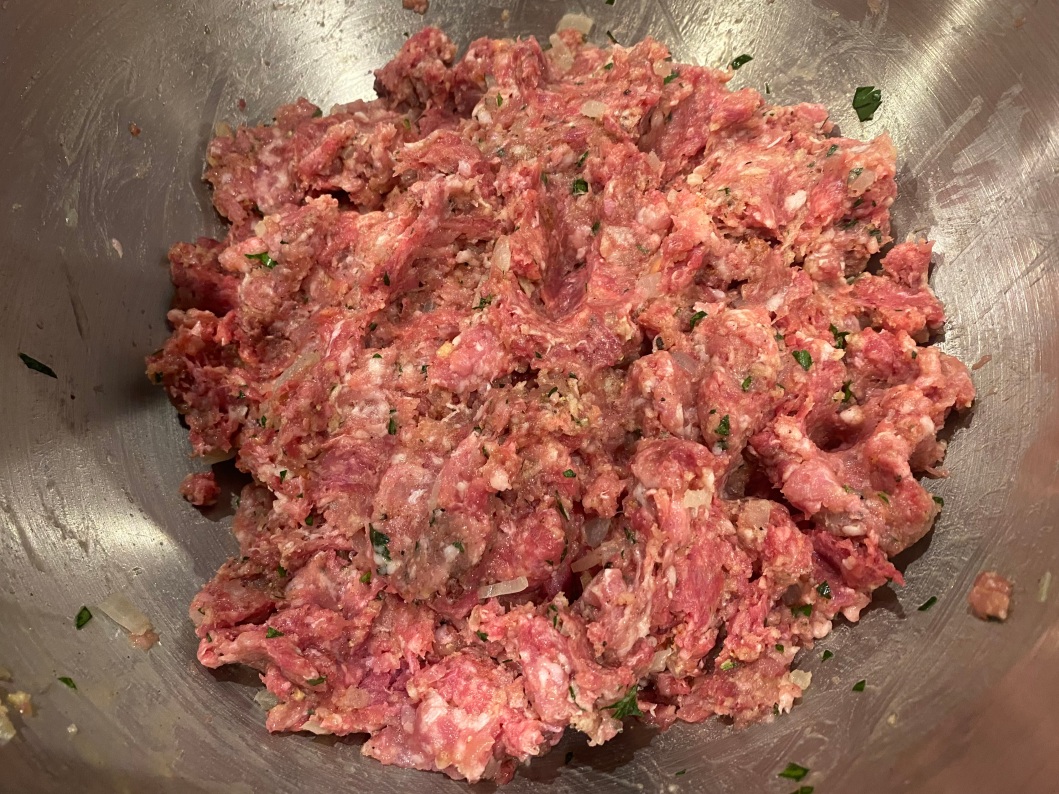
Using your hands, roll the mixture into 1 inch meatballs and set aside on a tray.

Preheat the oven to 200F.

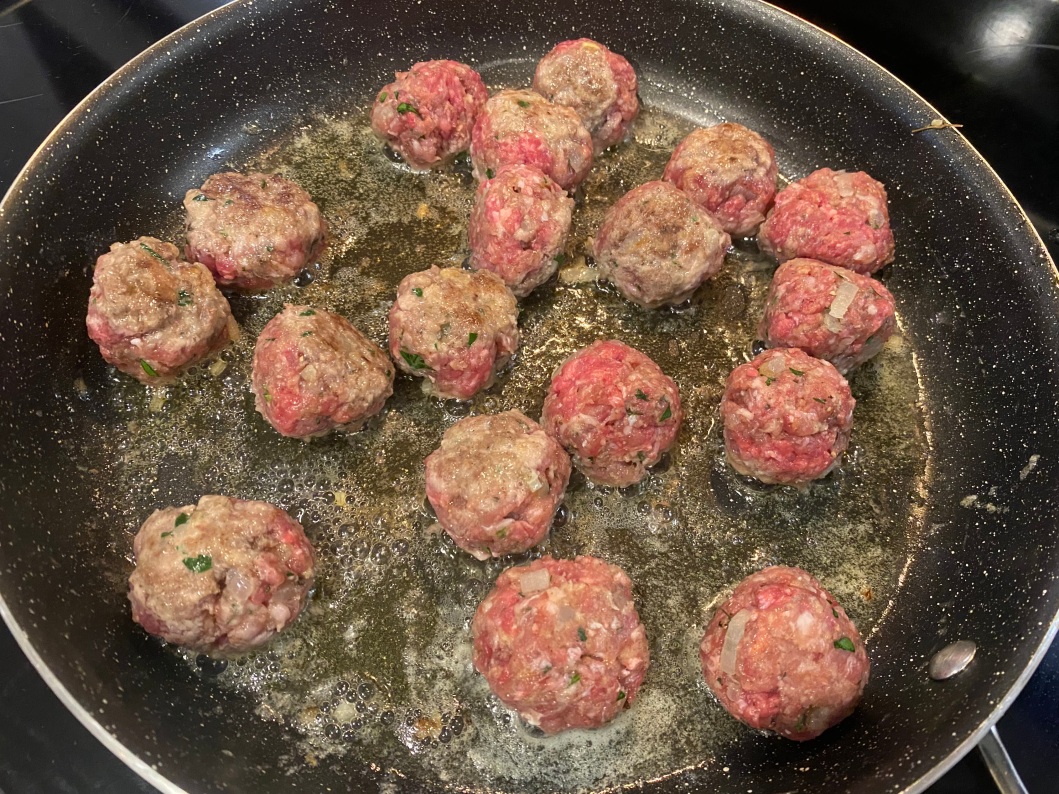
Using the same large skillet as for the onion, heat up the remaining 1 tbsp of butter and the olive oil over medium to medium high heat. Add the meatballs, working in batches, and cook while turning occasionally so that all the sides brown up nicely. Keep cooking until the meatballs are cooked through; about 10 minutes or so (I like to just cut one open to check, just to be sure).

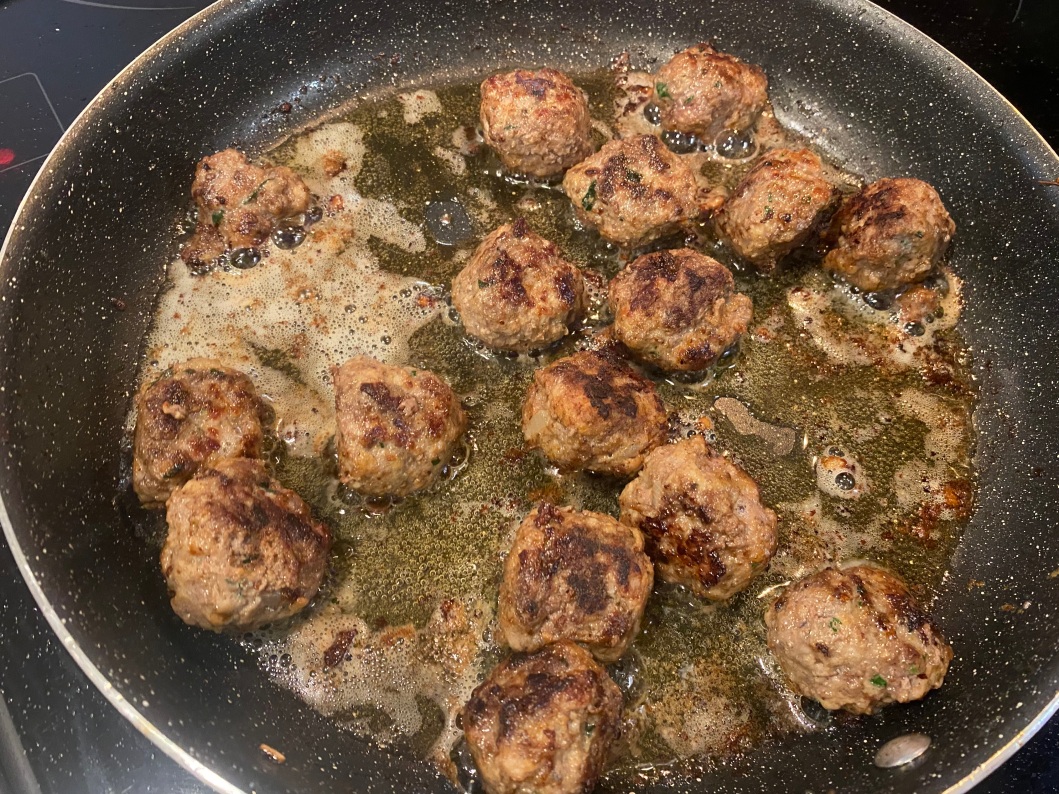
When your meatballs are cooked through, transfer to an ovenproof dish and and cover with aluminum foil. Put in the preheated oven to keep warm and get started on your next batch of meatballs. Continue and repeat until you’ve finished cooking all the meatballs.

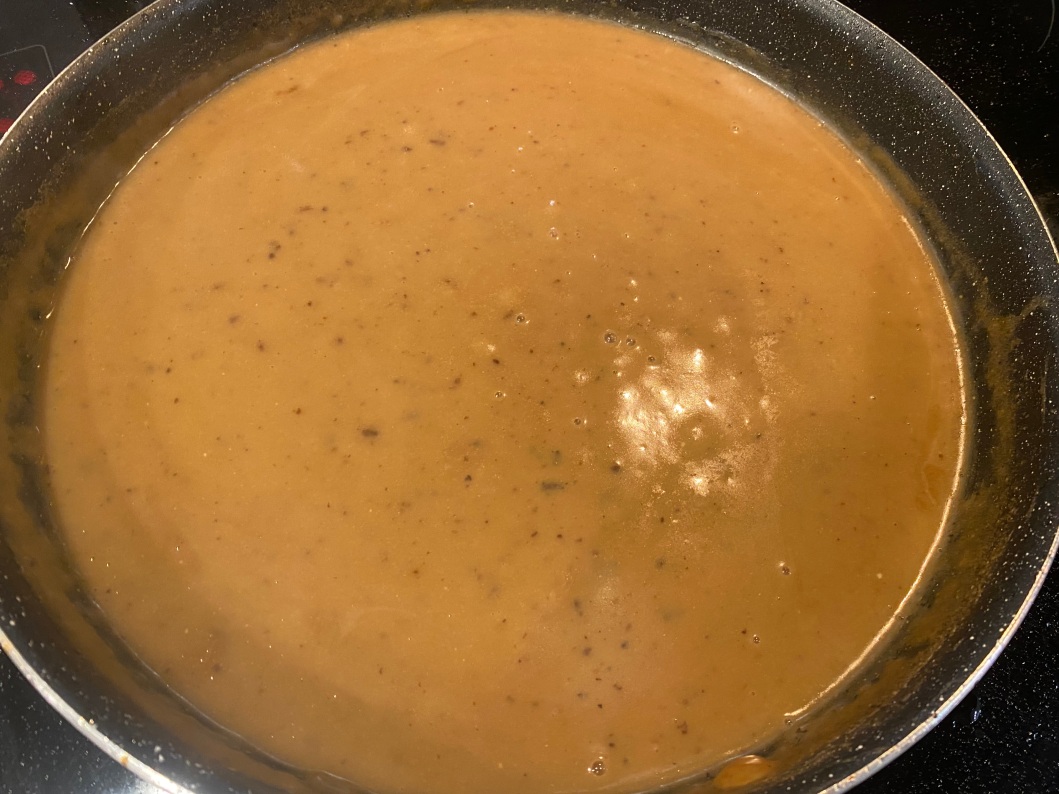
Then it’s time to do the sauce. In the same skillet without cleaning it, add in the butter for the sauce over medium high heat and once melted, whisk in the flour to make a roux. Cook while giving it a stir for a few minutes and then add in the beef stock. Whisk while cooking until the stock has thickened up and then add in the Worcestershire sauce, dijon and cream. Whisk until smooth and the sauce is the consistency of a thick gravy. Season to taste with salt and pepper.

Take the meatballs out of the oven and ladle the sauce over top. You’ll have more than enough sauce which is perfect so you can serve alongside some cooked egg noodles or mashed potatoes. If you’d like, scatter some chopped parsley on top. Enjoy!

cooking, Food, recipe, recipes, Thai food

pad thai

For the last couple of years in Riyadh, I ate a lot of pad thai at P.F. Chang’s which is ketchup-y and saucy and delicious. Very westernized and not at all authentic. This recipe is not for that! This is adapted from a recipe in the “Thailand: From the Source” cookbook from Lonely Planet which is full of authentic recipes from chefs and restaurants in Thailand. I’ve changed some of the ingredients and and taken out some that I can’t find easily but the end result is still great. It’s sour and sweet and salty… and easy!

You can make this without chicken if you’d like as it’s still quite substantial thanks to the egg and tofu. Alternatively you can also switch up the chicken for prawns or any other protein.

Serves 4.

4 tbsp canola oil / 200 grams firm tofu / 4 shallots / optional: ~300 grams skinless, boneless chicken / 200 grams dried flat rice noodles / 2 oz (1/4 of a block of) tamarind pulp* / 1/4 cup sugar (I used coconut sugar but brown sugar would be good too) / 1/4 cup fish sauce / 4 large eggs / a few stalks of green onion, sliced lengthwise / large handful of bean sprouts / 1/4 cup crushed unsalted roasted peanuts / 2 limes

*if you can’t find any tamarind pulp, you can maybe find readily prepared tamarind paste or sauce but it won’t be as flavourful. Otherwise you can also substitute with 1/4 cup white vinegar

First, you need to prepare the tamarind pulp so that you can actually cook with it! Pour about 1/3 cup of boiling hot water into a cup and add your chunk of tamarind paste. Let it sit for about 15 minutes and then using the back of a spoon kind of mash it about. Then push through a fine mesh strainer and scrape down to get all the paste through while leaving behind the tamarind fibres. You should end up with about 1/4 cup of tamarind paste. I know – the picture below looks like poop!

After the tamarind paste is prepped, soak the rice noodles in a large bowl boiling water until softened. This should be about 7 or 8 minutes but different brands may differ so check the instructions on the back of your packet of noodles. Once softened, drain the noodles and set aside.

While the noodles are soaking, you can prep your other ingredients. Thinly slice the shallots, dice up the tofu and cut your chicken into thin strips. You can also bash up your peanuts with a mortar and pestle or give them a quick blitz in a food processor.

Heat up the oil in a wok over medium-high heat and fry the shallots and tofu while stirring constantly. It will become lovely and fragrant and start to take on a bit of colour.

If you are including chicken, scoop up the tofu and shallots and set aside on a plate. Add the chicken to the hot oil and stir fry until cooked through. Add back in the tofu and shallots as well as the noodles, fish sauce, tamarind paste and sugar. Stir to combine. If the noodles are a bit sticky you can add a tablespoon or so of water.

Next, push everything to one side of the wok and crack in the eggs. Let the eggs cook a little bit and then gently stir to scramble them a bit. After about a minute, stir the eggs and noodle mixture all together.

Stir in the green onions and bean sprouts.

Remove from the heat and it’s time to plate up! Garnish with the crushed peanuts on top and serve with lime wedges. Other optional condiments you could add to the side would be Thai chilli powder (we used some crushed red pepper instead), sugar and fish sauce. Enjoy!

cornflake chicken strips
cooking, Food, recipe, Uncategorized

cornflake chicken strips

A friend sent me a recipe for cornflake chicken awhile back saying it was one of her kids’ favourite meals.  I think I misread the directions in the recipe, but they turned out to be chicken strips – and my kids LOVED them!  This isn’t that exact recipe but it doesn’t matter because my kids still love these and actually beg me to make them.  Definitely healthier than frozen chicken strips as they’re coated with cornflakes instead of breading and they are baked.  But still satisfyingly crunchy and yummy!

450 grams skinless, boneless chicken breasts / 2 eggs / 3/4 cup all-purpose flour / 1 tsp garlic powder / 1 and 1/2 tsp seasoned salt / 1 tsp paprika / 1/4 tsp cayenne pepper / 2 cups cornflakes

IMG_3043

First, preheat the oven to 400 F and then move onto all the prep. In a dish or a shallow bowl, lightly scramble the eggs and set aside.  On a large plate, combine the flour, garlic powder, seasoned salt, paprika and cayenne.  On another large plate, crush up the cornflakes just with your hands.  Then for the chicken breasts, cut lengthwise into strips.

IMG_3046

Now, to coat the chicken.  For each strip, first dredge the chicken the flour mixture to coat evenly.  Then, dip into the egg until also coated and then press into the crushed cornflakes on both sides.  After coating each strip, place on a parchment paper-lined baking sheet and continue with all the chicken until done.

IMG_3048

Pop into the oven for 20 minutes – the chicken should be completely cooked through by then but you should check just to be sure.

IMG_3049

And you’re done!  We had these with the classic kiddie favourite dips – ketchup and mayonnaise.

cornflake chicken strips

coconut, beef and potato curry
cooking, Food, Indian food, recipe, Uncategorized

coconut, beef and potato curry

I was flipping through a Christmas edition of an old Jamie Oliver magazine I had kicking around when this recipe caught my eye.  Meltingly tender brisket in a flavourful coconut curry? I’m all in.  I made a few minor adjustments and didn’t use any chillies because my kids like to complain about food being “spicy” lately and I just didn’t want to deal with the drama.  I’m sure this would be extra good with some heat to it but even without, it is really, really delicious and the brisket really is so tender.  It does take basically an afternoon to slow cook, but it is so worth it.

900 grams beef brisket, cut into bite-sized cubes / 2 medium yellow onions, thinly sliced / 5 cloves garlic, minced, 1 thumb-sized piece of fresh ginger, minced / 3 tbsp canola oil / 2 cinnamon sticks / 2 star anise / 1 tsp black peppercorns / 5 whole cloves / 1 tsp ground cardamom / 1 tbsp garam masala / 1 tbsp medium curry powder / 1 tbsp ground coriander / 1 400 ml can of full-fat coconut milk / 1 x 400 grams tin of whole tomatoes / 600 grams potatoes / sea salt to taste / (optional: 4 green chillies, sliced)

IMG_2900

Preheat the oven to 300 F.  Heat up your oil in a dutch oven over medium heat and then add in the sliced onions, cooking them for about 10 minutes or until they’re all soft and translucent.  Then add in the ginger, garlic, cloves, star anise, cinnamon sticks, cardamom and peppercorns (and chillies if you’re using them).  Mix in 200 ml of water and bring it to a boil.

IMG_2902

Turn the heat up to high and season the cubes of brisket with a bit of salt.  Add in the beef and mix to coat the beef with the onion-y spice mixture.

IMG_2904

Next, add in the coconut milk, the whole tomatoes (including the juice), garam masala, ground coriander and curry powder.  Add in a bit of salt to taste and then switch off the burner and pop the lid onto your dutch oven.

IMG_2907

Place the dutch oven into your preheated oven for 2.5 hours.  When that time is up, peel and cut up your potatoes into bite-sized cubes and add to the curry.  Give it a bit of a stir to get the potatoes all submerged and then put the lid back on and put back into the oven for a further 1.5 hours.

IMG_2908

Your whole house should smell amazing at this point!  And after being patient for the past 4 hours, your curry is ready.   The recipe in the magazine has this as a one-pot wonder but for me, rice is life so I had to serve it with some basmati rice.  Turned out amazing and Rock has already requested that I make it again soon!

coconut, beef and potato currycoconut, beef and potato curry

cooking, Food, recipe, Uncategorized

roasted miso chicken

I had never thought about cooking chicken with miso before but then I found this Nigella Lawson recipe in one of her books for a butterflied chicken with miso and sesame seeds.  This recipe is based off of that and with the flavours really dialled up.  This will give you really tasty chicken with solid miso flavour and also some sesame and garlic.  I used drumsticks this time because that’s what they had in the shop plus sometimes I’m too impatient to roast a whole chicken but you could do this with a whole chicken or chicken thighs too.

about 900 grams bone-in, skin-on chicken / 3 tbsp white miso paste / 1 tbsp soy sauce / 2 tsp sesame oil / 2 tsp fish sauce / 2 cloves garlic, minced

IMG_2810

Mix together the miso paste, soy sauce, sesame oil, fish sauce and garlic to make the marinade.  I did this in a glass baking dish but you could also use a large bowl or a large ziplock bag.

IMG_2811

Add in the chicken and make sure the chicken is all coated with the marinade.  Cover with clingfilm (or if using a ziplock, just zip it up) and put in the fridge to marinate overnight.

IMG_2813

When it’s time to cook, heat the oven to 425 F.  Place the chicken onto a roasting rack in a roasting tray.  Pro tip! Line the roasting tray with parchment first to make washing up a breeze.  I don’t always do this and then Rock nags me because I make him do the dishes.

IMG_2832

Pop into the oven for about 40 minutes, flipping the chicken over halfway through to make sure both sides of the chicken are nice and browned.  The chicken is definitely done when you check with a meat thermometer and get an internal temperature of 165 F.

IMG_2836

And then you’re done!  Plate up.  We had this with some calrose or sushi rice and a bit of sautéed shredded cabbage.

roasted miso chickenIMG_2840

homemade ginger beer
cooking, drinks, Food, recipe, Uncategorized

homemade ginger beer

Rock is on a blogging roll! Here he is again…

I really like a good ginger beer but they are hard to come by in this part of the world. We bought a bunch of old British cooking magazines awhile ago and we found this easy recipe.

2 limes / 120 grams of fresh ginger / 6 tablespoons of granulated sugar / cold carbonated or sparkling water

IMG_7222

Bring 100 ml of water to boil in a small saucepan with the sugar and the zest and the juice of the two limes.

IMG_7224

In the meantime, thinly slice the ginger. Add it to the boiling water and let simmer for 6 minutes.

IMG_1781

Remove from the heat and pour the syrup through a strainer or sieve to strain out the ginger and the lime zest. Let the remaining syrup cool down fully.

IMG_7225

To make the ginger beer, simply add some of the syrup to carbonated water to your taste.  I would suggest about 1 to 2 tablespoons for one glass of ginger beer but it is up to you how strong you want the flavour to be.  You can make a large batch if you’d like or if you want you can keep the ginger syrup in the fridge. Now we just need to find some rum…

homemade ginger beer

sourdough rye bread
baking, breakfast, cooking, Food, recipe, Uncategorized

sourdough rye bread

Rock has decided to blog for the first time in possibly a couple of years! He always wants me to edit his English but… I’m not going to. Here he is!

Bread is one of the principal forms of food for man from the dawn of time.  Archeologist found proof of stone-crushing barley and wheat use to make floor thought to be 7500 years old.  In the British Museums’ Egyptian galleries, you can see loaves which were made and baked over 5000 years old.  

My rye bread is actually quite easy to bake.  The difficult part is to get the sourdough starter strong enough to make a delicious loaf.  This part can take weeks or you can ask a friend to share some of them with you.  Linzi was kind enough to share hers with us.   The starter is actually natural yeast. The recipe is simple; 100 gr of floor, 100 ml of water and a tablespoon of yesterday mix all together.  You repeat this until the mixture double his size in 6 hours. Every day you need to feed it.   If you don’t bake, the major part of the mixture will be discarded.   This ratio is sufficient to bake a bread and have enough left for a feeding.

When the sourdough starter doubles his size in 6 hours and the smell is very sour, you can put together the ingredients to bake your bread.

2 cups of all-purpose flour / 1 cup of rye flour / ¾ cup sourdough starter / 1 ¼ cups of warm water / 1 tablespoon of honey (optional) / 1 and ½ teaspoon of salt

IMG_7172

I mix the dry ingredients, flour and salt, first in the mixer bowl.  Then, I mix the water, the sourdough starter and the honey in a different bowl. The honey is optional but it will give you a nice brown color and a boost for the yeast.  Add the wet ingredient into the dry ingredients and mix until combined; cover with a dishtowel and let sit for 15 minutes.

IMG_7174

Using the dough hook, knead the dough for 5 minutes at medium speed.  Most likely you will need to add flour.  The goal here is to have a dough that is still clinging to the bottom of the bowl but clearing the upper part of the bowl.  The dough will be wet and sticky so don’t use too much flour.

IMG_7178

Transfer the dough into a medium size bowl coated with a little of oil; I use olive oil.  Cover with a plastic sheet and let rise for 3 hours.  I turn and fold the dough once or twice during the first rise.  The texture of the dough will change rapidly from a stick ball to a firm, none sticky, very elastic dough.  The smell will get stronger too.

After 3 hours, I turn and fold it again.  I form a nice ball and transfer it on a parchment paper.  I use an upside-down bowl to cover the dough for the second rise, about 2.5 hours.

IMG_7179

20 minutes before the end of the second rise, I put a pizza stone in the oven and turn it to 450 F.  This will permit the stone to warm up nicely.  

When ready, I dust up the dough with some flour and make some cut in the middle, about 1 cm deep.  Set the dough in the middle of the pizza stone and bake for 30 min.

IMG_7199

Then remove the bread from the pizza stone and transfer it on a cooling rack.

Et voila!

IMG_7200

I really like this bread.  We tried different kind of flour.  If you use 3 cup of all-purpose flour you will get a better rise and the final product is less dense.  The next experiment will be with spelt flour. 

No-bake cheesecake
cooking, dessert, Food, recipe, recipes, Uncategorized

no-bake cheesecake

I don’t know why I haven’t been making more no-bake cheesecakes in my life! I have made more cheesecakes than I can count and I know basically every trick in the book for getting cheesecakes to bake up just right.  But this was just so damn easy!!!  And while not like a baked cheesecake, I think it’s just as delicious – just different.  The filling is much lighter and mousse-like and just lightly sweetened. Nothing wrong with that.

I decided to make this today because for the first time since we moved to Saudi, I found bricks of real cream cheese!  (All that’s ever been available is the spreadable form of cream cheese in tubs.)  This is adapted from Nigella Lawson’s Cherry Cheesecake recipe and it is just so easy and soooo delicious.  Just note that while I’ve already made a more substantial crust, this recipe doesn’t yield the tallest cheesecake.  Which we’re totally happy with but if you want a tall/deep cheesecake like say New York-style, then I would suggest you double the ingredients for the filling.

Crust: 250 grams digestive biscuits or graham crackers / 150 grams (6 tbsp) unsalted butter, melted

Filling: 300 grams (10 oz) cream cheese, room temperature (the kind in brick form, not in a tub) / 60 grams (1/2 cup) icing sugar / 1 tsp vanilla extract / 1/2 tsp fresh lemon juice (which I forgot – oops!) / 1 cup heavy or whipping cream

Optional topping: 3 cups of strawberries, hulled / 2 tbsp granulated sugar

IMG_1549

Blitz the digestive crackers or graham crackers until they’re crumbs in either a blender or food processor.  Add in the melted butter and pulse to combine.

IMG_1572

Press the crust mixture into the bottom of an 8 inch springform pan.

IMG_1574

Pop into the fridge just to chill and let it set up a bit while you move onto the filling.  Beat together the cream cheese, icing sugar, vanilla and lemon juice until smooth.  I used the paddle attachment on my stand mixer because I’m lazy but you could always just do it by hand.

IMG_1575

In a separate bowl, whip the cream until you get medium peaks. (Nigella’s recipe said to just “lightly whip” but I figured medium peaks was a good middle ground.)  Again I used my stand mixer with the whisk attachment but you could just whisk it by hand.

IMG_1576

Using a spatula, gently fold the whipping cream by hand into the cream cheese mixture until everything is combined and smooth.

IMG_1577

Gently spoon the filling onto the crust and spread evenly.

IMG_1578

Cover with clingfilm and chill and set in the fridge for minimum 3 hours or overnight. (I obviously went with the bare minimum.)

If you want you can have the cheesecake on it’s own. Or you can top it with some macerated strawberries.  The shop was completely out of fresh strawberries so I used some defrosted frozen ones – not ideal but still did the trick. Simply mix the strawberries with the sugar and let it sit at room temperature for about 30 minutes.  I piled up most of the strawberries on top of the cheesecake with some extra on the side but you can do whatever you’d like obviously.  Slice up and enjoy!

No-bake cheesecake


Thai roast chicken
cooking, Food, recipe, Thai food, Uncategorized

Thai roast chicken

We picked up this cookbook Ready or Not!: 150+ Make-Ahead, Make-Over, and Make-Now recipes by Nom Nom Paleo by Michelle Tam and Henry Fong years ago at Costco.  Despite the fact that we are definitely not paleo nor do we strive to be!  We’ve flipped through it loads but definitely have not actually tried as many recipes from it as I’d like.  Since it’s one of the few cookbooks from our large collection that Rock decided to bring over to Saudi, I figure we should finally put it to use.

This recipe is super easy and uses just a handful of ingredients.  I always have Thai curry paste on hand but I only ever use it for curry (shocker!) so I thought I’d give this a shot.  The chicken turned out great and even the kids loved it!

Makes 4 servings.

1 cup full-fat coconut milk / 2 tbsp Thai curry paste (I used red but I think green would be  really good too!) / 2 tsp fish sauce / 1 tsp sea salt (adjust to taste) / 2 limes / 1 kg to 1.5 kg bone-in and skin-on chicken thighs

IMG_1456

Measure out the coconut milk in a measuring cup and then to that same cup just add the curry paste, fish sauce, salt, and the zest and juice of 1 lime.  Mix well to combine and you can give it a little taste to see if you want to add anymore salt.

IMG_1457

In a large ziplock bag or a large bowl, mix the chicken thighs with the marinade making sure to thoroughly coat the chicken.  Refrigerate for up to one day or if you don’t have time you can just keep going.  I think ideally though of course you give it some time to marinate – I started marinating mine in the morning for dinner that day.

IMG_1459

Heat the oven to 425 F (or 400 F on convection mode) and place the chicken on a wire rack on top of a rimmed baking sheet.  I have a roasting pan that comes with a wire rack that fits in it so I used that.  Arrange the chicken in a single layer with the skin side down.

IMG_1469

Roast in the oven for 20 minutes and then flip the chicken to be skin side up and rotate the pan 180 degrees.

IMG_1470

Roast for another 20 minutes or so.  The skin should be a bit browned and if you check with a meat thermometer, internal temperature should be 165 F.

IMG_1475

Plate the chicken and then sprinkle over the zest of your remaining lime.  We didn’t have any leftovers (…!) but the book says leftovers can be reheated, eaten cold or shredded for salads or soups which all sound like good ideas.

Thai roast chicken

easy Mongolian beef
Chinese food, cooking, Food, recipe, Uncategorized

easy mongolian beef

I had never heard of Mongolian Beef before until we had it at PF Chang’s here in Riyadh but it is delicious!  Obviously not an authentic Chinese dish and most definitely not Mongolian, but delicious nonetheless.  Basically it is thinly sliced flank steak and green onions in a sweet soy glaze. Yum!  This is the third time I’ve tried making it and this time not only was it the easiest with the least amount of steps and ingredients but also the best flavour.

At PF Chang’s the beef is most definitely shallow or deep fried to make it really crispy but I decided to keep it a bit on the healthier side by just stir-frying.  (If you’d like to get the beef super crisp though, you can fry in, I would say, about 1 cup of canola oil and then drain the excess oil before adding the sauce.).

Marinated beef: 500 grams flank steak / 2 tbsp cornstarch / 1 tbsp soy sauce / 1 tbsp cold water

4 cloves of garlic, minced / 1 bunch of green onions – just the green leaves, cut into thirds lengthwise / 2 tbsp canola oil / 1/4 cup soy sauce / 1/4 cup light brown sugar

IMG_1385

Cut the steak thinly against the grain of the beef.  In a medium bowl, combine the sliced beef, and the cornstarch, cold water and 1 tablespoon of soy sauce so that the beef is throughly coated.  Cover with clingfilm and set in the fridge for 30 minutes to 1 hour to marinate.

In the meantime, simply mix together the 1/4 cup soy sauce and brown sugar in a small bowl for the sauce and set aside.

IMG_1390

In a large wok or frying pan, heat up the oil on medium-high heat.  Add the beef and half of the green onion.  Stir-fry, letting the beef develop some crispier brown bits by not stirring constantly.  When the beef is almost cooked through, add in the minced garlic and stir-fry.

IMG_1393

Pour in the soy and brown sugar sauce and stir until it’s thickened up and glossy.  The cornstarch from the beef marinade will cause it to thicken.

IMG_1394

Toss in the remaining green onion, remove from the heat and plate up!  I like to serve this with some jasmine rice and just some simple steamed broccoli.

easy Mongolian beef