sourdough rye bread
baking, breakfast, cooking, Food, recipe, Uncategorized

sourdough rye bread

Rock has decided to blog for the first time in possibly a couple of years! He always wants me to edit his English but… I’m not going to. Here he is!

Bread is one of the principal forms of food for man from the dawn of time.  Archeologist found proof of stone-crushing barley and wheat use to make floor thought to be 7500 years old.  In the British Museums’ Egyptian galleries, you can see loaves which were made and baked over 5000 years old.  

My rye bread is actually quite easy to bake.  The difficult part is to get the sourdough starter strong enough to make a delicious loaf.  This part can take weeks or you can ask a friend to share some of them with you.  Linzi was kind enough to share hers with us.   The starter is actually natural yeast. The recipe is simple; 100 gr of floor, 100 ml of water and a tablespoon of yesterday mix all together.  You repeat this until the mixture double his size in 6 hours. Every day you need to feed it.   If you don’t bake, the major part of the mixture will be discarded.   This ratio is sufficient to bake a bread and have enough left for a feeding.

When the sourdough starter doubles his size in 6 hours and the smell is very sour, you can put together the ingredients to bake your bread.

2 cups of all-purpose flour / 1 cup of rye flour / ¾ cup sourdough starter / 1 ¼ cups of warm water / 1 tablespoon of honey (optional) / 1 and ½ teaspoon of salt

IMG_7172

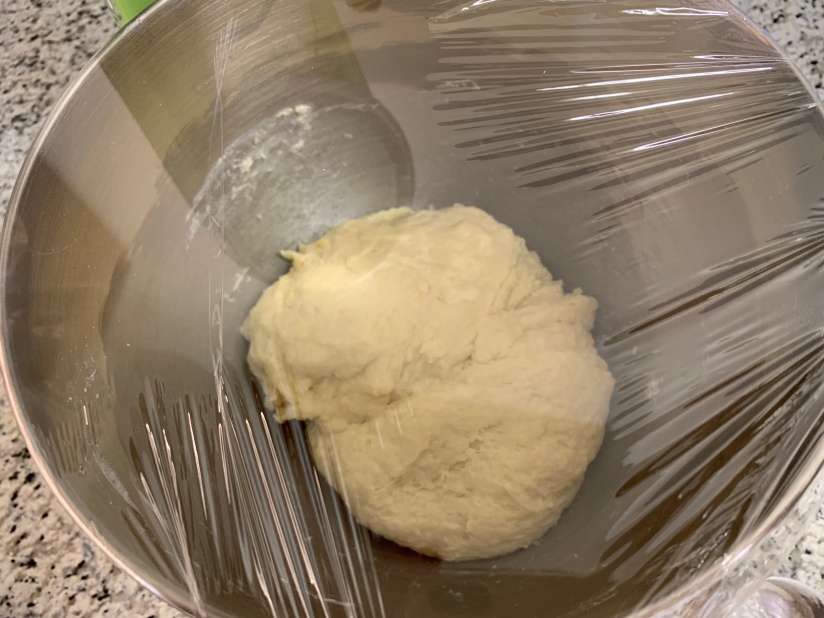
I mix the dry ingredients, flour and salt, first in the mixer bowl.  Then, I mix the water, the sourdough starter and the honey in a different bowl. The honey is optional but it will give you a nice brown color and a boost for the yeast.  Add the wet ingredient into the dry ingredients and mix until combined; cover with a dishtowel and let sit for 15 minutes.

IMG_7174

Using the dough hook, knead the dough for 5 minutes at medium speed.  Most likely you will need to add flour.  The goal here is to have a dough that is still clinging to the bottom of the bowl but clearing the upper part of the bowl.  The dough will be wet and sticky so don’t use too much flour.

IMG_7178

Transfer the dough into a medium size bowl coated with a little of oil; I use olive oil.  Cover with a plastic sheet and let rise for 3 hours.  I turn and fold the dough once or twice during the first rise.  The texture of the dough will change rapidly from a stick ball to a firm, none sticky, very elastic dough.  The smell will get stronger too.

After 3 hours, I turn and fold it again.  I form a nice ball and transfer it on a parchment paper.  I use an upside-down bowl to cover the dough for the second rise, about 2.5 hours.

IMG_7179

20 minutes before the end of the second rise, I put a pizza stone in the oven and turn it to 450 F.  This will permit the stone to warm up nicely.  

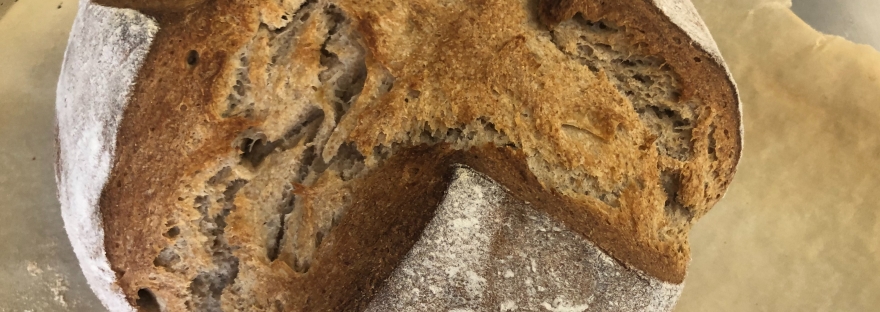
When ready, I dust up the dough with some flour and make some cut in the middle, about 1 cm deep.  Set the dough in the middle of the pizza stone and bake for 30 min.

IMG_7199

Then remove the bread from the pizza stone and transfer it on a cooling rack.

Et voila!

IMG_7200

I really like this bread.  We tried different kind of flour.  If you use 3 cup of all-purpose flour you will get a better rise and the final product is less dense.  The next experiment will be with spelt flour. 

blueberry basil pancakes
breakfast, brunch, cooking, Food, recipe, Uncategorized

blueberry basil pancakes

It’s not that often that there’s fresh basil in the shop here so I had to snatch some up when they had it in stock.  This morning I decided to try and replicate these delicious blueberry basil pancakes we had at Slappy Cakes in Portland.  They turned out really great and are just a fun (and easy!) switch up on regular ol’ pancakes.

2 cups all-purpose flour / 2 tsp baking powder / 1/4 tsp sea salt / 2 tsp granulated sugar / 2 large eggs / 1 and 1/2 cups milk (whatever kind: plant-based, buttermilk, etc.) / 150 grams fresh blueberries / 10 grams fresh basil leaves / unsalted butter for cooking

IMG_1189

In a large bowl, whisk together the flour, baking powder, salt and sugar.  Next, using a blender or a hand blender, blitz the milk, blueberries and basil leaves together.  There should still be some speckles of blueberry and basil visible.

IMG_1192

Add the milk mixture and the eggs to the dry ingredients.  Whisk together just until everything is combined – do not over-mix.  The batter should still be lumpy.  If you find the batter too thick, you can thin it down with a bit more milk.

IMG_1193

Heat up a large frying pan over medium heat. Melt some butter in the pan and swirl it around to coat.  Using a 1/4 cup, measure out the batter for your pancakes.  Of course you can also make larger pancakes if you want.  (And for our kids, we put the batter into a squeeze bottle and make dinosaur shapes and turtle shapes!)  Pour the batter onto the pan and let it cook until there are bubbles forming on the top and a few of the bubbles have popped.

IMG_1196

Using a spatula, flip the pancakes over.  Let them cook on the other side for another 1 to 2 minutes or until golden brown and then they are done.  Plate up and serve with whatever toppings you’d like.  Of course as Canadians, we always have our pancakes with some real maple syrup.

blueberry basil pancakes

masala chai pound cake
baking, breakfast, cooking, dessert, Food, recipe, Uncategorized

masala chai pound cake

After making my espresso coffee cake, I started thinking about making a cake using tea.  I decided to try making a chai cake and I found a recipe for a chai-spiced pound cake on the King Arthur Flour website that looked good but I wanted it to actually have tea in it as well and not just the spices.  So I spent a silly amount of time reading up on adding tea into baked goods – the easiest way would be to steep tea in milk or another liquid used in your recipe but this pound cake recipe didn’t have any liquid in it.  So I decided to infuse the butter with tea!

A couple of things – you do need to melt the butter, infuse it, and then let it cool back to room temperature which takes some time so just keep that in mind.  And also, you’ll need to start off with more butter than is needed in the recipe because after you add the tea, the tea will absorb some of the butter and you’ll lose some as you strain it.  The end result is fab though – the cake actually tastes like a warming cup of masala chai.

300 grams of unsalted butter (the cake will actually only require 16 tbsp or 227 grams of infused butter) / 4 black tea bags / 1 cup light brown sugar / 1/4 cup honey / 2 large eggs, room temperature / 1 tsp baking powder / 1/4 tsp baking soda / 1 tsp sea salt / 1 tbsp ground cinnamon / 2 tsp ground ginger / 2 tsp ground cardamom / 1 and 1/2 tsp ground allspice or ground cloves / 1 tsp black pepper powder / 2 cups all-purpose flour 1 cup full fat Greek yogurt, room temperature / 2 tsp vanilla extract

IMG_0488 2

In a small saucepan over medium heat, add the butter and melt.  Tear open the tea bags and add the tea leaves to the melted butter.  Open at least one of the tea bags carefully so that you can use it to line a small strainer. Turn the heat down to low and let the tea steep in the butter for 5 minutes.

IMG_0496

Take the saucepan off the heat and let it steep for a further 5 minutes.  Using one of the opened tea bags, line a small strainer and then pour the butter through to strain out the tea. If a bit of the tea does end up in the butter, no big deal.

IMG_0494 2

OK and now for what I found to be the toughest part – waiting for the butter to cool and solidify as the recipe requires room temperature, not melted, butter!  I’m pretty impatient so I stuck the bowl in the fridge for about 40 minutes, giving it a stir a couple times.

IMG_0497 2

Hard part is done.  Preheat the oven to 350F.  Add 227 grams or 16 tbsp of the tea-infused butter, the brown sugar and the honey to the bowl of a stand mixer.  Using a paddle attachment, beat at medium speed for two minutes.

IMG_0498 2

Add the eggs one at a time.  Beat on medium speed for two minutes in between each addition.  Then stir in the baking powder, baking soda, salt, cinnamon, ginger, cardamom, allspice or cloves and black pepper.

IMG_0499 2

Stir in half of the flour just until incorporated and then add in the yogurt and vanilla.  Again, stir just until incorporated.  Scrape down the sides of the bowl as needed. Add in the last half of the flour and stir just until incorporated.

IMG_0501 2

Lightly grease with butter and lightly flour a 9 or 10-cup bundt pan.  Spread the cake pan evenly into the pan.

IMG_0502 2

Bake for about 50 minutes or until a toothpick / dry spaghetti noodle comes out of the centre clean.  Let the cake cool in the pan for about 15 minutes before removing from the pan.

IMG_0503 2

Let the cake cool completely on a cooling rack before slicing.  Enjoy!

masala chai pound cakeIMG_0512 2


breakfast, brunch, cooking, Food, recipe, recipes, Uncategorized

classic pancakes

This is Rock’s recipe for super easy, light and fluffy pancakes.  Most weekends, our daughter wakes up way too early asking for “turtle pancakes” which are, well, pancakes shaped like a turtle.  When we went to Portland, we went to the restaurant Slappy Cakes where they serve squeeze bottles of pancake batter and you make your own on a griddle on the table.  So ever since then, Rock likes to make pancakes into different shapes for the kids – Anouk always wants turtles and Aymeric always wants dinosaurs.  This time, we went with the classic, but it’s totally worth having squeeze bottles around just for fun-shaped pancakes!

Makes 12 pancakes

2 cups all-purpose flour / 2 tsp baking powder / 1/4 tsp salt / 2 large eggs / 1 and 1/2 to 2 cups milk or plant-based milk / unsalted butter for cooking

IMG_8878

Start by heating up a large non-stick pan over medium heat.  Using a whisk, mix together all the dry ingredients in a large bowl.  Then add in the milk and the eggs and whisk just until everything is combined; the batter should still be a bit lumpy as you don’t want to over mix.  If the batter is too thick, thin it down with a bit more milk.

IMG_8879

Melt a bit of butter in the pan and swirl it around to coat. Then using a 1/4 cup measuring cup (or just approximate this amount), pour the batter onto the pan.  Cook until you can see some bubbles forming at the top and a few of the bubbles have popped.

IMG_8883

Using a spatula, flip the pancakes over and cook for another 1 to 2 minutes or until the bottom side is now also golden brown.

IMG_8884

Repeat until you’re finished up the batter and that’s it! We like to have our pancakes with a bit of salted butter and some real Canadian maple syrup.

IMG_8887


baking, breakfast, brunch, cooking, dessert, Food, recipe, recipes, Uncategorized

mini banana muffins

Bananas here in Saudi seem to over-ripen super quick so I have made this recipe more times than I can count.  I adapted this recipe from one I found on allrecipes.com and it is super quick and easy.  And most importantly, kids absolutely LOVE them!

Makes 48 mini muffins

1 and 1/2 cups all-purpose flour / 1 tsp baking powder / 1 tsp baking soda / 4 ripe bananas, mashed  / 1/2 cup granulated sugar / 1/3 cup melted butter / 1 large egg

IMG_2800

Preheat your oven to 375F.  In a large bowl, mix together the flour, baking soda and baking powder.  In a separate bowl, mix together the melted butter, the mashed bananas, sugar, and the egg.

IMG_2801

Add the wet ingredients into the dry ingredients and mix until just combined.

IMG_2802

Spoon the batter evenly into the muffin tin cups.  I like to use paper liners but I’ve also baked these without liners when I don’t have any (like this time!) Just grease with some butter or spray with a baking spray and they’ll be fine.

IMG_2803

Bake for about 15 minutes or until a toothpick (or my preferred tool – a dry spaghetti noodle) comes out clean.

IMG_2805

baking, breakfast, brunch, dessert, Food, recipe, recipes, Uncategorized

cinnabon cinnamon buns

IMG_2377

In a bowl, dissolve the yeast in the warm milk (I just heated up the milk in the microwave and you want it just a bit above body temperature but not too hot as to kill the yeast).  Add in 1 tsp of the sugar and let it bloom for about 5 to 10 minutes.  It should start to bubble a little bit.

In your mixing bowl, mix the sugar, flour, butter, salt and eggs until well combined.

IMG_2378

Add in the yeast/milk mixture and use the dough hook to mix and knead the dough.  My dough was too wet and very sticky so if you experience the same, add just a little more flour, bit by bit, until you get a smooth dough.

IMG_2381

Cover the bowl with clingfilm and place the bowl somewhere a bit warm (I always put my doughs in a cupboard in the study) to rise for at least an hour or until it has roughly doubled in size.

IMG_2383

On a lightly floured surface, roll out the dough out into a rough rectangle about 16 inches long x 12 inches wide and 1/4 inches thick.  Spread the butter for the filling evenly across the dough.

IMG_2387

Combine the brown sugar and cinnamon in a bowl and then spread that all over top of the butter.

IMG_2390

And now it’s time to roll! Working from the long side, gently roll the dough with your hands from top to bottom.  Then, using a sharp knife, cut the dough into 1 and 1/2 inch slices. Place the slices into a parchment paper-lined baking dish.  The recipe calls for a 9 x 13 inch pan, which we don’t have so we just used a large roasting pan but that worked perfectly fine.

IMG_2391

IMG_2392

Cover with clingfilm and let it rise again for about 30 minutes to 1 hour or until the buns have roughly doubled in size.  In the meantime, preheat the oven to 350F.  When the buns have risen, bake for about 30 to 35 minutes or until golden brown.  The original recipe does say to bake for just 20 minutes so I would suggest you just check every now and again after 20 minutes to make sure you don’t over-cook the buns.

IMG_2397

While the buns are baking, you can make the cream cheese frosting.  Put all the ingredients for the frosting into a mixing bowl and using a paddle attachment, mix until the frosting is light and fluffy.

IMG_2393

When the buns are finished baking, let them cool just a little bit (or not – it’s hard to resist fresh out of the oven cinnamon buns!) and top with the frosting. SO GOOD.

IMG_2402

Something I’ll try next time is prepping the buns so they’re ready to bake first thing in the morning.  The recipe I used says that after you’ve gotten to the step where you’ve rolled the dough and sliced it up into the buns, you can cover with clingfilm and just let it complete the second rise as a cold rise in the fridge overnight.  Then in the morning, you can pick up where you left and bake them off.  Would be great to have these freshly baked for breakfast!

Galettes Bretonnes
breakfast, brunch, cooking, Food, recipe, recipes, Uncategorized

galettes bretonnes (buckwheat crepes)

For Le Chandeleur (February 2), Rock always insists on us eating crepes.  Some sort of superstition about having a prosperous year…? I don’t mind; any reason to eat crepes! This year we tried making these savoury buckwheat crepes from Brittany.  I had never tried buckwheat before but turns out it’s highly nutritious and not actually related to wheat but rather to rhubarb.  You can fill these with anything but apparently ham, Gruyere and an egg is a classic, so that’s what we went with.  This recipe is from Lonely Planet’s France: From the Source cookbook and comes from one of the oldest creperies in the Brittany town of Quimper.

Makes 5 crepes.

250 grams buckwheat flour / 1/2 tsp sea salt / 1 egg / 500 ml water / melted butter for frying / fillings of your choice

IMG_0280

Mix together the buckwheat flour, salt, egg and half of the water for about 4 or 5 minutes by hand.  The recipe calls to refrigerate overnight but I just did it for a few hours.

IMG_0279

Mix in the other half of the water.

IMG_0281

Heat up a large frying pan over medium to medium high heat and melt some butter in the pan.  Ladle some of the galette batter into the pan and turn the pan to spread the batter into a circle.  While the galette is cooking, place your fillings in the middle.  I cracked an egg in the middle and using a spatula just kind of spread the egg white around a bit and then added cheese and ham.  Season with a bit of salt and pepper too if you’d like.

IMG_0287

When the galette is a bit crisp on the bottom and the egg whites have cooked through (I covered the pan with a lid just to make sure the yolk was heated a bit too), use a spatula and fold down the four sides to form a square.

Galettes Bretonnes

We started cooking with our toddler recently as a fun rainy days project so if you want to see the little video I put together of him cooking these galettes, check it out here!

shakshuka
breakfast, brunch, cooking, Food, recipe, Uncategorized

shakshuka

I can’t believe we’d never had this before!  A friend from my UVIC days who also happens to be doing Whole30 right now recommended I try making shakshuka so that’s just what I did this morning.  I had to google it and it’s a Tunisian dish of eggs poached in a spicy tomato sauce that’s popular in the Middle East and North Africa. It’s usually a breakfast dish but can also be dinner.  Sold! Love breakfast for dinner. I’ve actually seen similar recipes in a couple of my cookbooks but they just went by different names.  Anyway, there seems to be a hundred slightly different ways you can prepare this dish and I read maybe 10 different recipes… and then just winged it ‘cus I got too confused. But it turned out great! Will definitely be making this again.

Makes enough for 2 servings

1 tin (28 oz) of whole tomatoes, excess liquid drained  /  1/2 yellow onion  /  1/2 red pepper (I had a sweet pointed pepper that I used)  /  2 cloves garlic  /  1 tsp cumin seeds  / 2 tsp Hungarian smoked paprika  /  1/2 tsp crushed red pepper flakes /  4 eggs  /  olive oil  /  small handful of chopped cilantro (I’m lying. I was lazy and just ripped some up)  /  salt and pepper to taste

IMG_1115Mince the garlic and dice up the onion and red pepper.  Heat up maybe a tbsp or so of olive oil in a cast iron skillet over medium heat and cook the garlic, red pepper and onion until the veggies have softened and the onion has gone translucent.  Then stir in the crushed pepper flakes, paprika and cumin seeds.IMG_1116

Tip in the tin of drained tomatoes and just kind of break up the tomatoes with a spatula or wooden spoon.  Lower the heat a bit and let it simmer away for about 10 minutes.  Season with salt and pepper to taste and then its time to add the eggs.  As you add each egg, make a little well in the sauce first to crack them into.

IMG_1118

Now you just have to be patient and let the eggs poach in the sauce.  I was not patient though and in the end, I put a lid on the skillet for just about a minute to quickly finish cooking the eggs.  You’ll have to poach them for probably about 10 minutes but it just depends on how cooked you want the eggs; I wanted the yolks still a bit runny.  You can check how cooked the eggs are by gently poking the centre with your finger.

And that’s it!  Finish off by drizzling some more olive oil over top and scattering some cilantro over.  Rock had his serving with some baby potatoes and I had just a piece of toast with it but this would be amazing with some nice crusty bread to sop up the sauce.  I also saw some variations that add some feta cheese or black olives or prosciutto over top so you could always try that too.

IMG_1120

Pesto chicken bagel melt
breakfast, brunch, cooking, Uncategorized

pesto chicken bagel melt

I know i’ve been terrible at blogging but Rocks’s been away for work so I’m not that motivated to cook for just me and my increasingly picky toddler. This recipe is barely a recipe really but it’s what I’ve been craving to eat lately. I had something similar to this at a local cafe months ago but it’s off the menu now so I can’t look up what’s exactly in it. Which is ok though cus this bagel is just as good. I’ve tried using cream cheese instead of mayonnaise but I prefer it with mayo. You can use whichever you like though; it’ll still turn out!

for 1:

1 everything bagel  /  ~ 1/3 cup shredded cooked chicken  /  ~1 tbsp fresh pesto  /  ~1 tbsp mayonnaise  /  2 slices of whatever cheese you’ve got on hand which for me right now is havarti

img_0896

Slice and toast your bagel.  In a small bowl, mix together the chicken, mayo and pesto. Turn your broiler on high and when your bagel is done toasting, place the halves on a baking sheet. Spread the pesto chicken mixture evenly on the bagel halves and then slap a slice of cheese over each. Broil until the cheese is all melted and voila!  I dunno if it’s my pregnancy hormones but I am obsessed.

Pesto chicken bagel melt


lenox almond biscotti
baking, breakfast, dessert, Food, recipe, Uncategorized

rock’s post: lenox almond biscotti

I always liked to drink coffee or tea with a cookie; but the biscotti is a way better option !  Like the name says, a biscotti is a twice-baked cake that you can dip in beverage.  Because they are dry and could be stored for long periods of time, they were particularly useful during long journeys and wars, and twice baked breads were a staple food of the Roman legion; just a little history interesting fact.  This recipe is from Dorie Greenspan’s Baking: From My Home to Yours.

(for about 30 biscotti)

1 and 1/2 cup of all-purpose flour  /  1 and 1/2 tsp baking powder  /  1/4 tsp of salt /  1/2 cup yellow cornmeal  /  8 tbsp of butter  /  1 cup of sugar  /  2 large eggs  / 1 and 1/2 tsp of pure vanilla extract (the original recipe was calling for almond extract but I made a substitution)  /  3/4 cup of sliced almond blanched or not

image

Whisk the flour, baking powder, salt and cornmeal together in a bowl.  Then separately, I used the stand mixer with the paddle attachment to beat the butter and sugar together until very smooth, takes about 3 minutes at medium speed.  Add the eggs to the butter mixture and beat until smooth and creamy.  Add the vanilla extract, reduce the speed to low and add the dry ingredients until integrated.  You should have a very sticky dough.  Add the almonds and mix just to blend.

image

Good time to turn the oven to 350F with the rack centre.

Split the dough in two.  On a baking sheet lined with a piece of parchment paper, work the half the dough into a log about 12 inches long by 1.5 inches wide. Don’t try to shape the dome, just a very nice rough, uneven, bumpy rectangular.  Work the second half on the other side of the baking sheet.

image

Bake for 15 minutes or until the logs are lightly golden but still soft when to push on it.  Transfers the sheet to a cooling rack for at least 30 minutes.

image

Re-heat the oven to 350 F if you turn it off.

With a lot of care, transfers the cakes to a cutting board.  Cut the log the into 3/4 inch thick slices.   Re-transfer the slices to the baking sheet, standing side by side.

image

Bake them for 15 minutes or golden and firm.  Back on the cooling rack for the last time!  Let them cool down to room temperature if you can wait that long !  They will stay good  for a week.  You can store them on the counter but they won’t last long…

imagelenox almond biscotti